> ## Documentation Index
> Fetch the complete documentation index at: https://www.qovery.com/docs/llms.txt
> Use this file to discover all available pages before exploring further.
# AWS EKS
> Learn how to configure your AWS Kubernetes clusters on Qovery
**Default Autoscaling Mode**
All AWS EKS clusters on Qovery now use Karpenter for autoscaling, which automatically launches the right compute resources to handle your cluster's applications.
Karpenter automatically launches just the right compute resources to handle your cluster's applications. It is designed to let you take full advantage of the cloud with fast and simple compute provisioning for Kubernetes clusters.
You can read our [blog post](https://www.qovery.com/blog/save-up-to-60-on-aws-costs-with-eks-and-karpenter/) for more information.
## Creating an AWS EKS Cluster
### Connect Your AWS Account
Qovery needs credentials to manage resources in your AWS account. Choose your preferred method:
**Most secure method** - Uses temporary credentials that auto-rotate. No access keys to manage.
**What gets created**: A CloudFormation stack creates an IAM role with this policy:
```json theme={null}
{
"Version": "2012-10-17",
"Statement": [
{
"Effect": "Allow",
"Action": [
"iam:*",
"s3:ListAllMyBuckets",
"cloudwatch:*",
"autoscaling:*",
"application-autoscaling:*",
"elasticloadbalancing:*",
"organizations:DescribeAccount",
"organizations:DescribeOrganization",
"organizations:DescribeOrganizationalUnit",
"organizations:DescribePolicy",
"organizations:ListChildren",
"organizations:ListParents",
"organizations:ListPoliciesForTarget",
"organizations:ListRoots",
"organizations:ListPolicies",
"organizations:ListTargetsForPolicy",
"dynamodb:*",
"ecr:*",
"ec2:*",
"elasticache:*",
"cloudtrail:LookupEvents",
"dynamodb:*",
"tag:GetResources",
"rds:*",
"ecs:*",
"eks:*",
"logs:*",
"events:DescribeRule",
"events:DeleteRule",
"events:ListRuleNamesByTarget",
"events:ListTargetsByRule",
"events:PutRule",
"events:PutTargets",
"es:AddTags",
"es:RemoveTags",
"es:ListTags",
"es:DeleteElasticsearchDomain",
"es:DescribeElasticsearchDomain",
"es:CreateElasticsearchDomain",
"events:RemoveTargets",
"kms:*",
"events:TagResource",
"events:UntagResource",
"events:ListTagsForResource"
],
"Resource": "*"
},
{
"Action": [
"s3:*",
"sqs:*"
],
"Effect": "Allow",
"Resource": [
"arn:aws:s3:::qovery*",
"arn:aws:s3:::qovery*/*",
"arn:aws:sqs:*:*:qovery*",
"arn:aws:sqs:*:*:qovery*/*"
]
}
]
}
```
**Setup Steps**:
1. **Open CloudFormation**: Click this link to create the IAM role
* [Launch CloudFormation Stack](https://console.aws.amazon.com/cloudformation/home?#/stacks/quickcreate?templateURL=https%3A%2F%2Fcloudformation-qovery-role-creation.s3.amazonaws.com%2Ftemplate.json\&stackName=qovery-role-creation)
* This opens AWS CloudFormation in a new tab (login to AWS if needed)
2. **In AWS CloudFormation Console**:
* Click **Next** (template is pre-filled with Qovery's requirements)
* Stack name: Keep default `qovery-iam-role` or customize
* Click **Next** (skip stack options)
* Click **Next** again (skip tags)
* ✅ **Important**: Check **"I acknowledge that AWS CloudFormation might create IAM resources"**
* Click **Create stack**
3. **Wait for completion** (\~1 minute):
* Status changes: `CREATE_IN_PROGRESS` → `CREATE_COMPLETE`
* Refresh page if needed
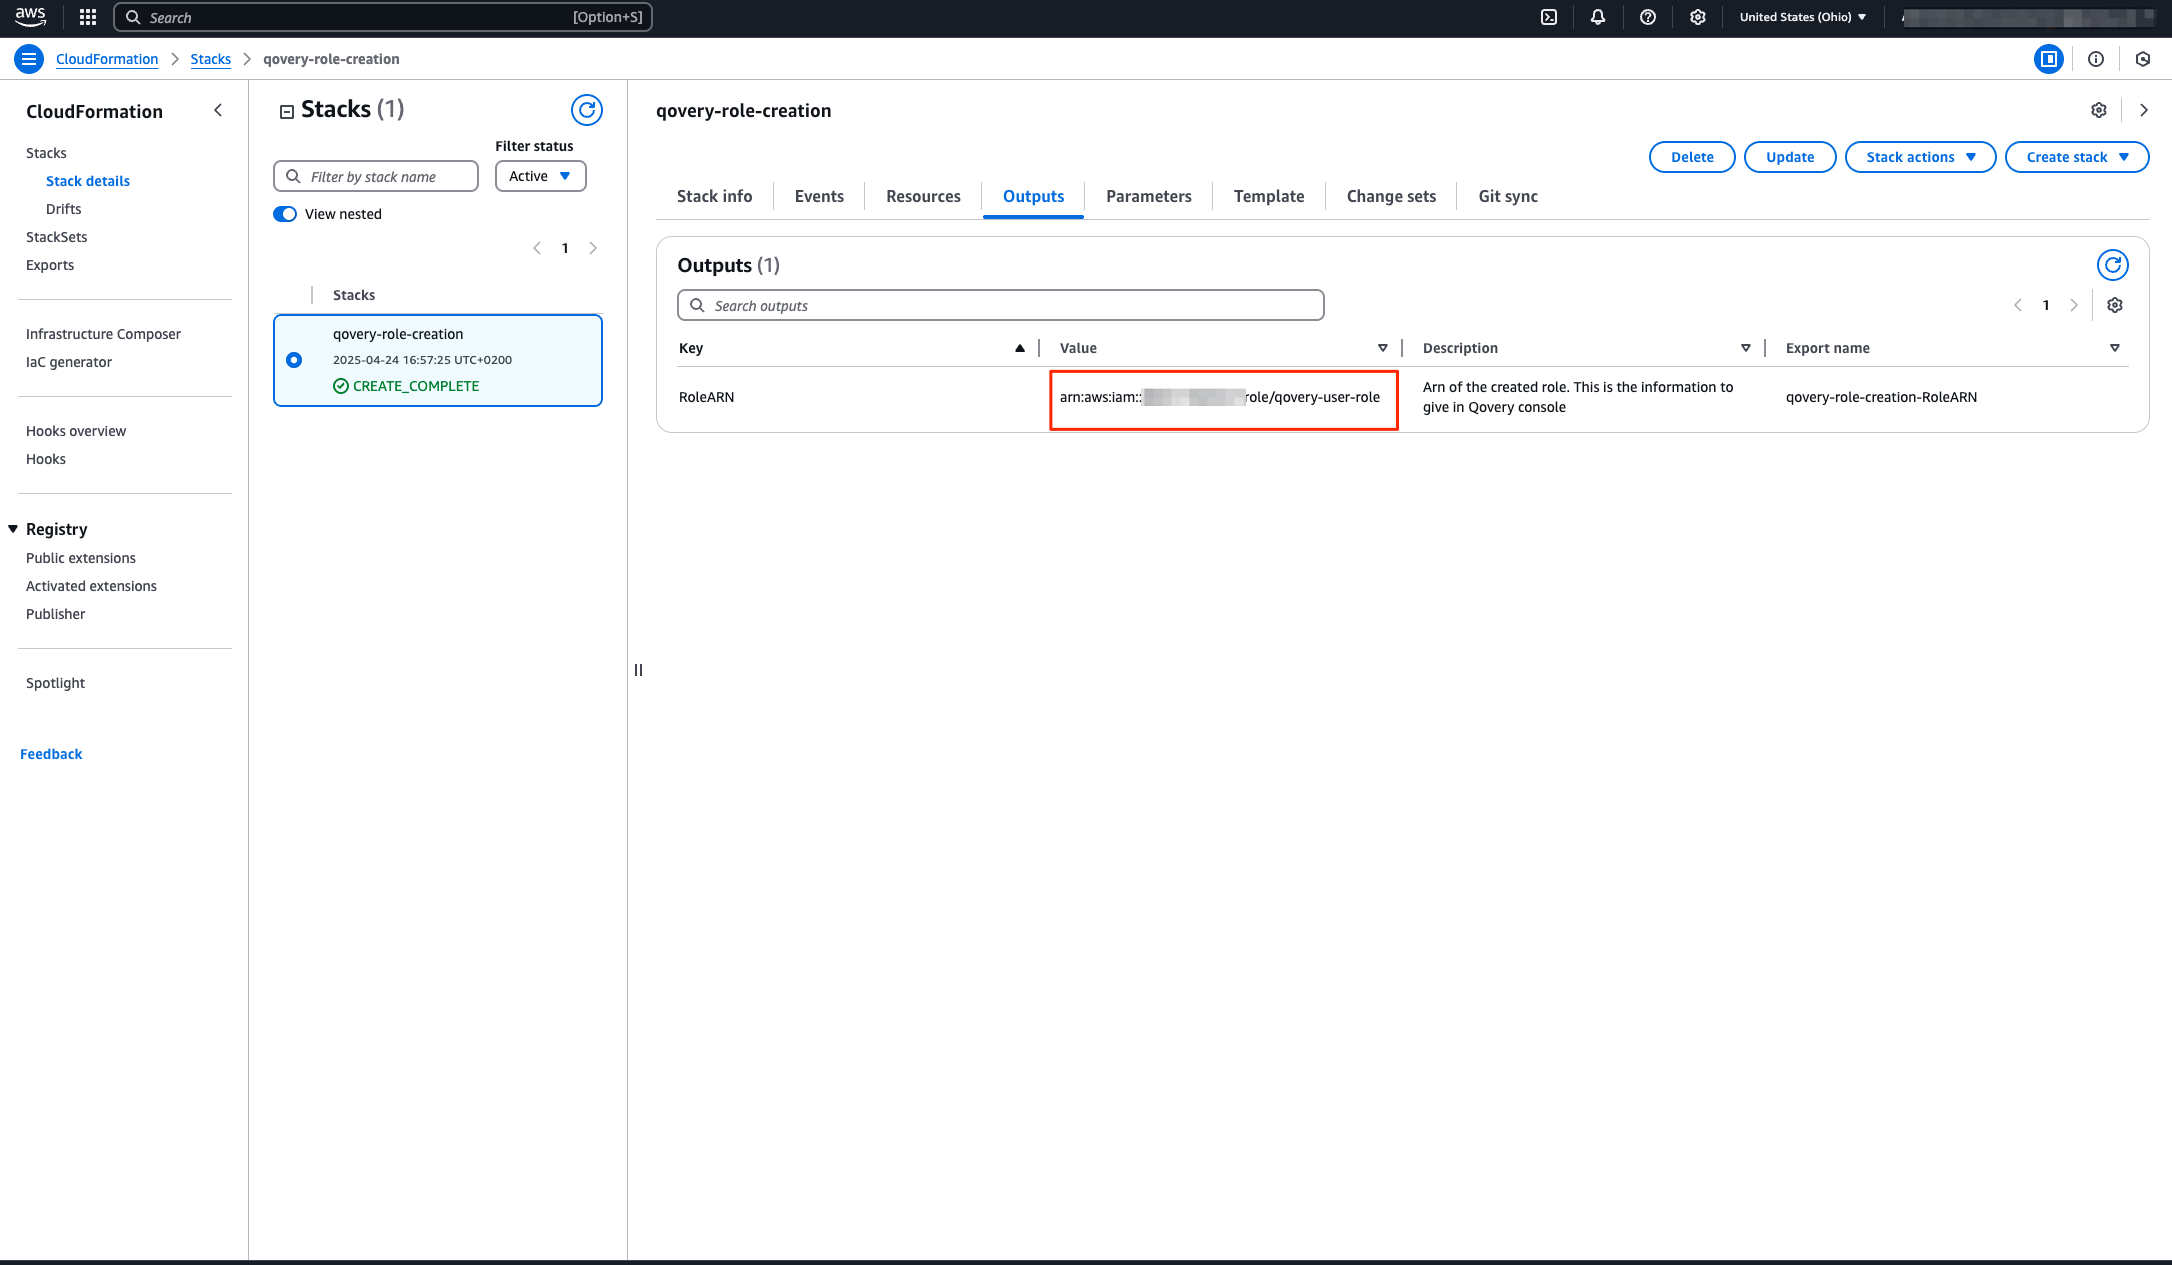
4. **Get the Role ARN**:
* Click on the **Outputs** tab
* Find **RoleArn** key
* Copy the value (looks like: `arn:aws:iam::123456789012:role/qovery-role`)
 5. **Complete in Qovery**:
* Back in Qovery, paste the **Role ARN**
* Give it a name like `AWS Production`
* Click **Save**
5. **Complete in Qovery**:
* Back in Qovery, paste the **Role ARN**
* Give it a name like `AWS Production`
* Click **Save**
 **Why this is recommended**: The IAM role uses AWS STS (Security Token Service) to generate temporary credentials that automatically rotate. Qovery never has access to long-lived credentials, and you can revoke access instantly by deleting the CloudFormation stack.
Qovery requires these AWS permissions to manage your infrastructure:
* **EC2**: Create VPCs, subnets, security groups, and instances
* **EKS**: Create and manage Kubernetes clusters
* **IAM**: Create service roles for EKS and EC2
* **ELB**: Create load balancers for your applications
* **S3**: Store Terraform state and logs
* **CloudWatch**: Collect logs and metrics
You can review the full CloudFormation template before creating the stack.
Yes! For production environments, you can create a custom IAM policy with minimum required permissions. Contact support for the minimal policy template.
**Alternative method** - Uses AWS Access Keys (requires manual rotation every 90 days).
**Security Note**: Static credentials are long-lived and more exposed to leaks. For production, we strongly recommend STS Assume Role which provides short-lived, automatically refreshed credentials with granular access control.
**Setup Steps**:
1. **Connect to AWS Console**:
* Go to [AWS Console](https://console.aws.amazon.com)
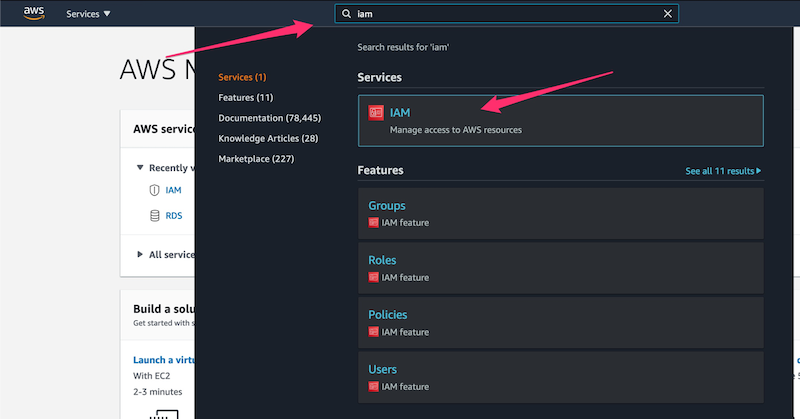
2. **Navigate to IAM**:
* Go to **IAM** service
**Why this is recommended**: The IAM role uses AWS STS (Security Token Service) to generate temporary credentials that automatically rotate. Qovery never has access to long-lived credentials, and you can revoke access instantly by deleting the CloudFormation stack.
Qovery requires these AWS permissions to manage your infrastructure:
* **EC2**: Create VPCs, subnets, security groups, and instances
* **EKS**: Create and manage Kubernetes clusters
* **IAM**: Create service roles for EKS and EC2
* **ELB**: Create load balancers for your applications
* **S3**: Store Terraform state and logs
* **CloudWatch**: Collect logs and metrics
You can review the full CloudFormation template before creating the stack.
Yes! For production environments, you can create a custom IAM policy with minimum required permissions. Contact support for the minimal policy template.
**Alternative method** - Uses AWS Access Keys (requires manual rotation every 90 days).
**Security Note**: Static credentials are long-lived and more exposed to leaks. For production, we strongly recommend STS Assume Role which provides short-lived, automatically refreshed credentials with granular access control.
**Setup Steps**:
1. **Connect to AWS Console**:
* Go to [AWS Console](https://console.aws.amazon.com)
2. **Navigate to IAM**:
* Go to **IAM** service
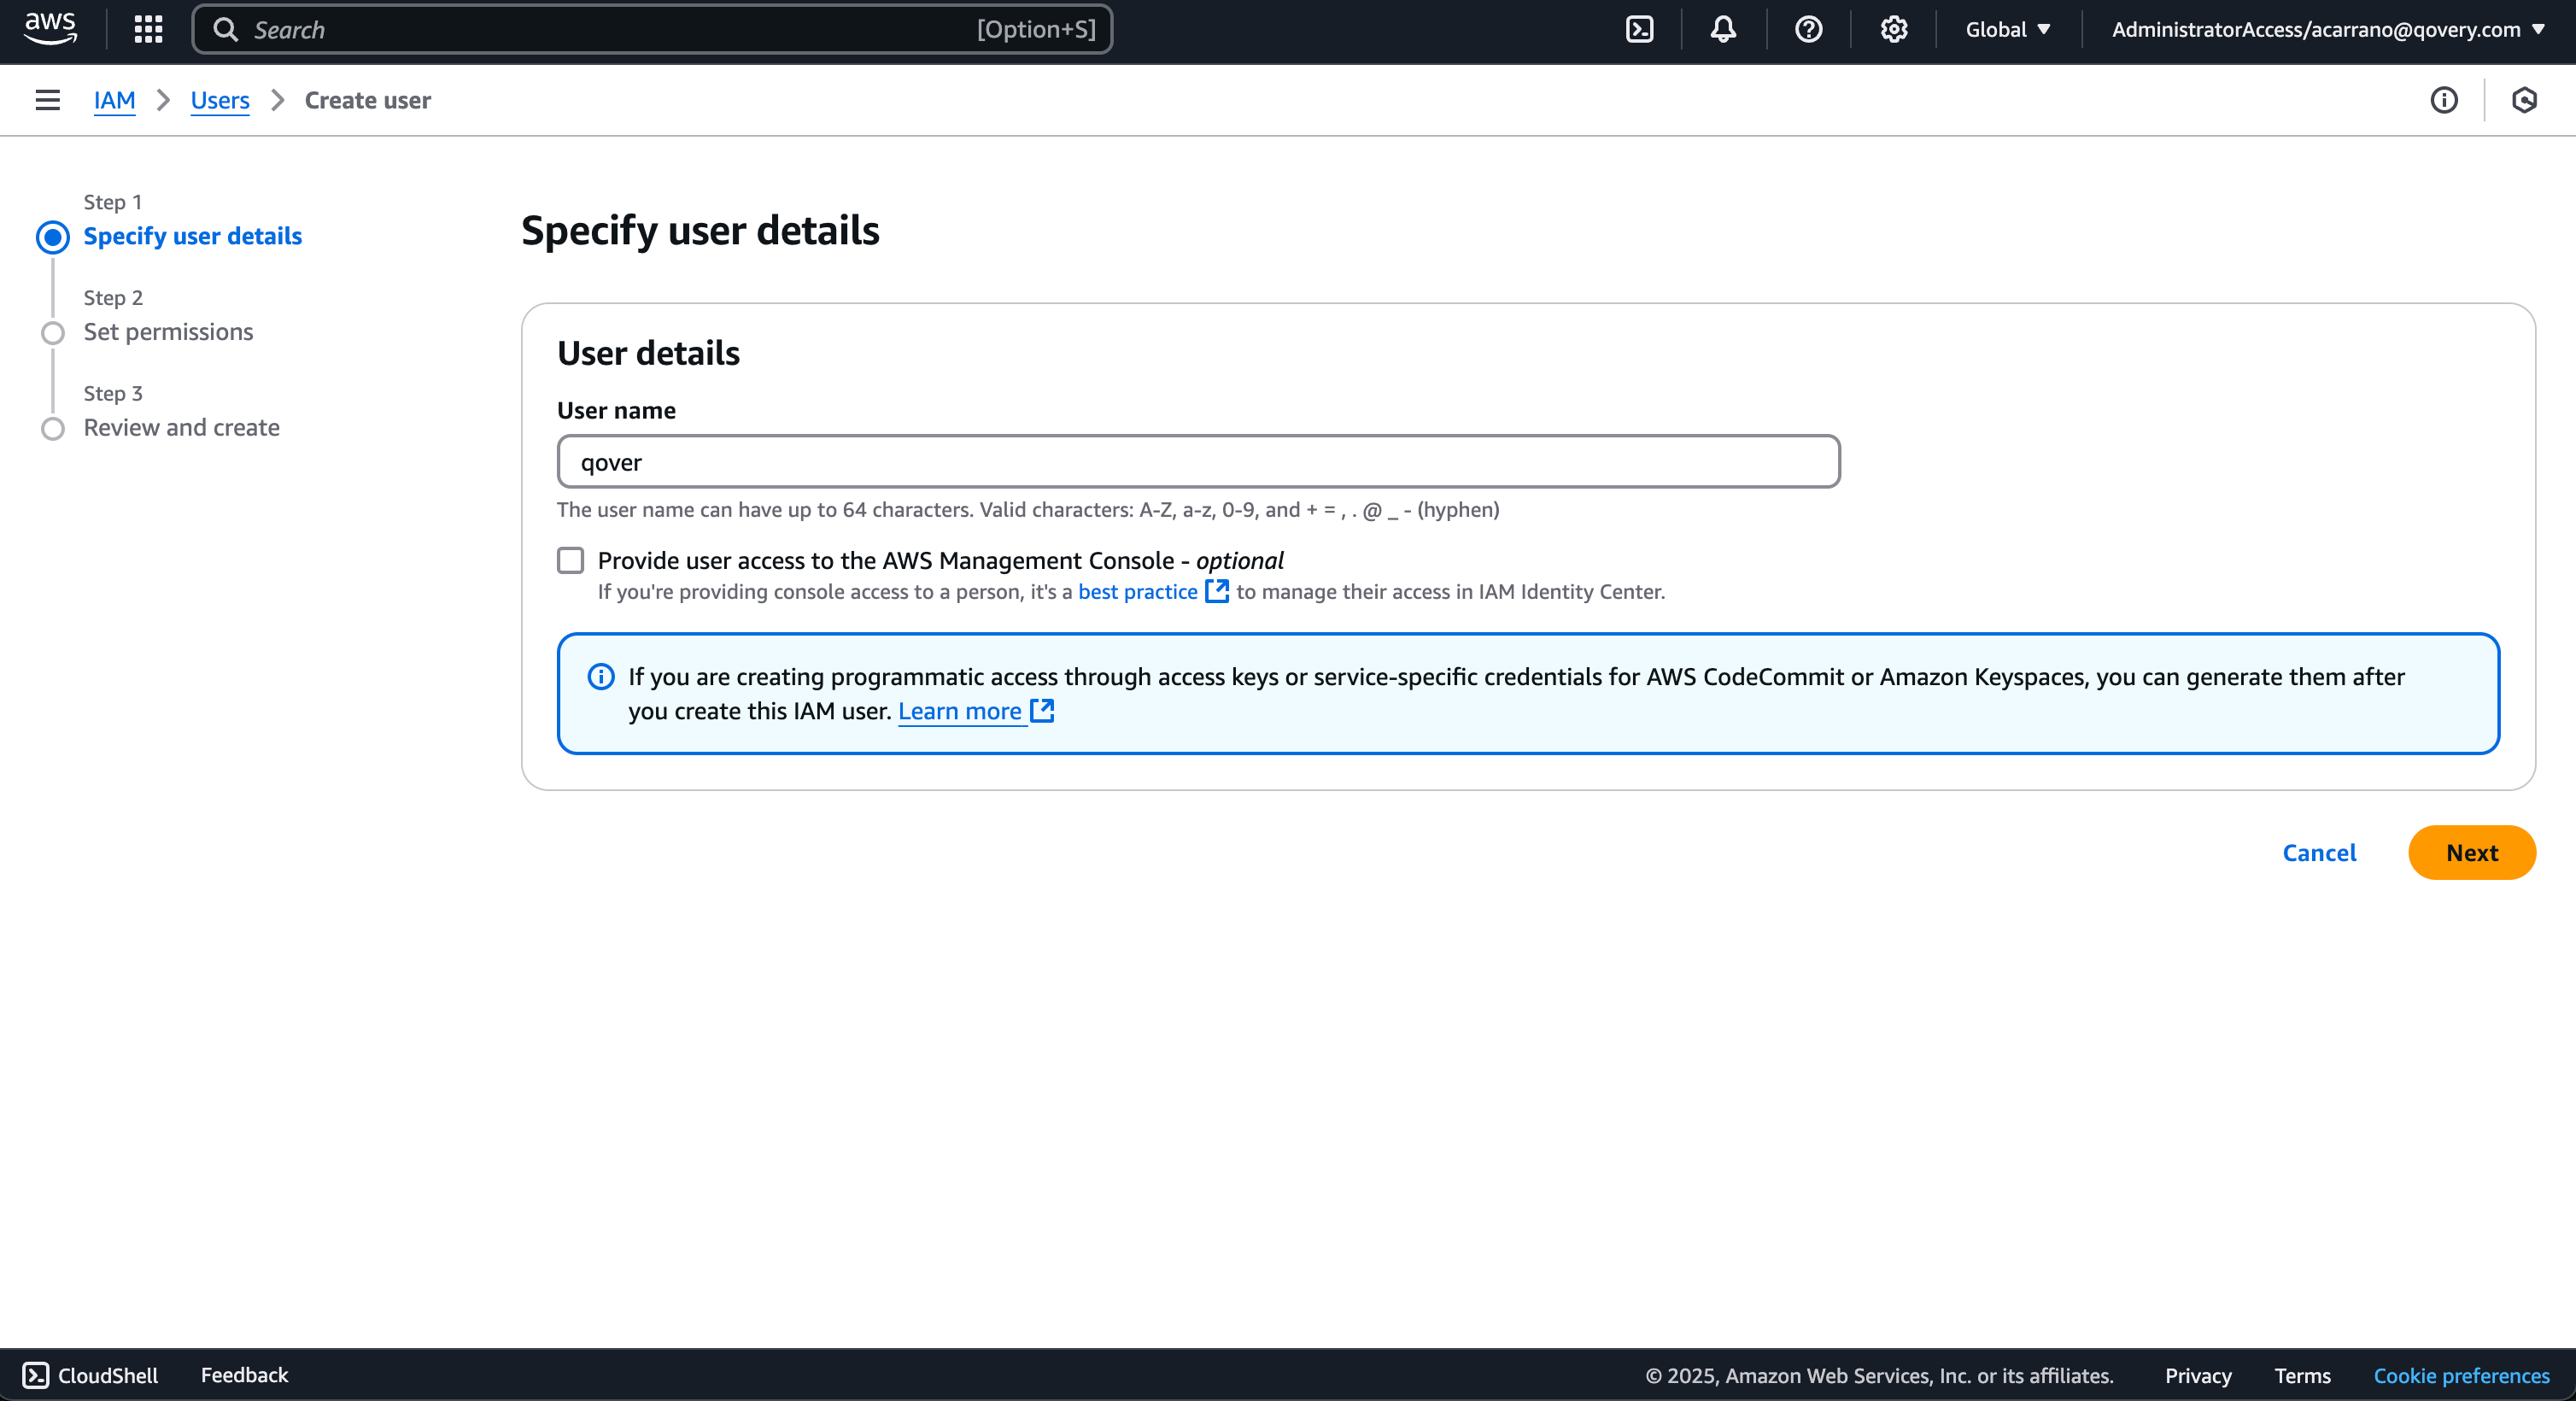
 3. **Create IAM User**:
* Create one IAM user called `qovery`
3. **Create IAM User**:
* Create one IAM user called `qovery`
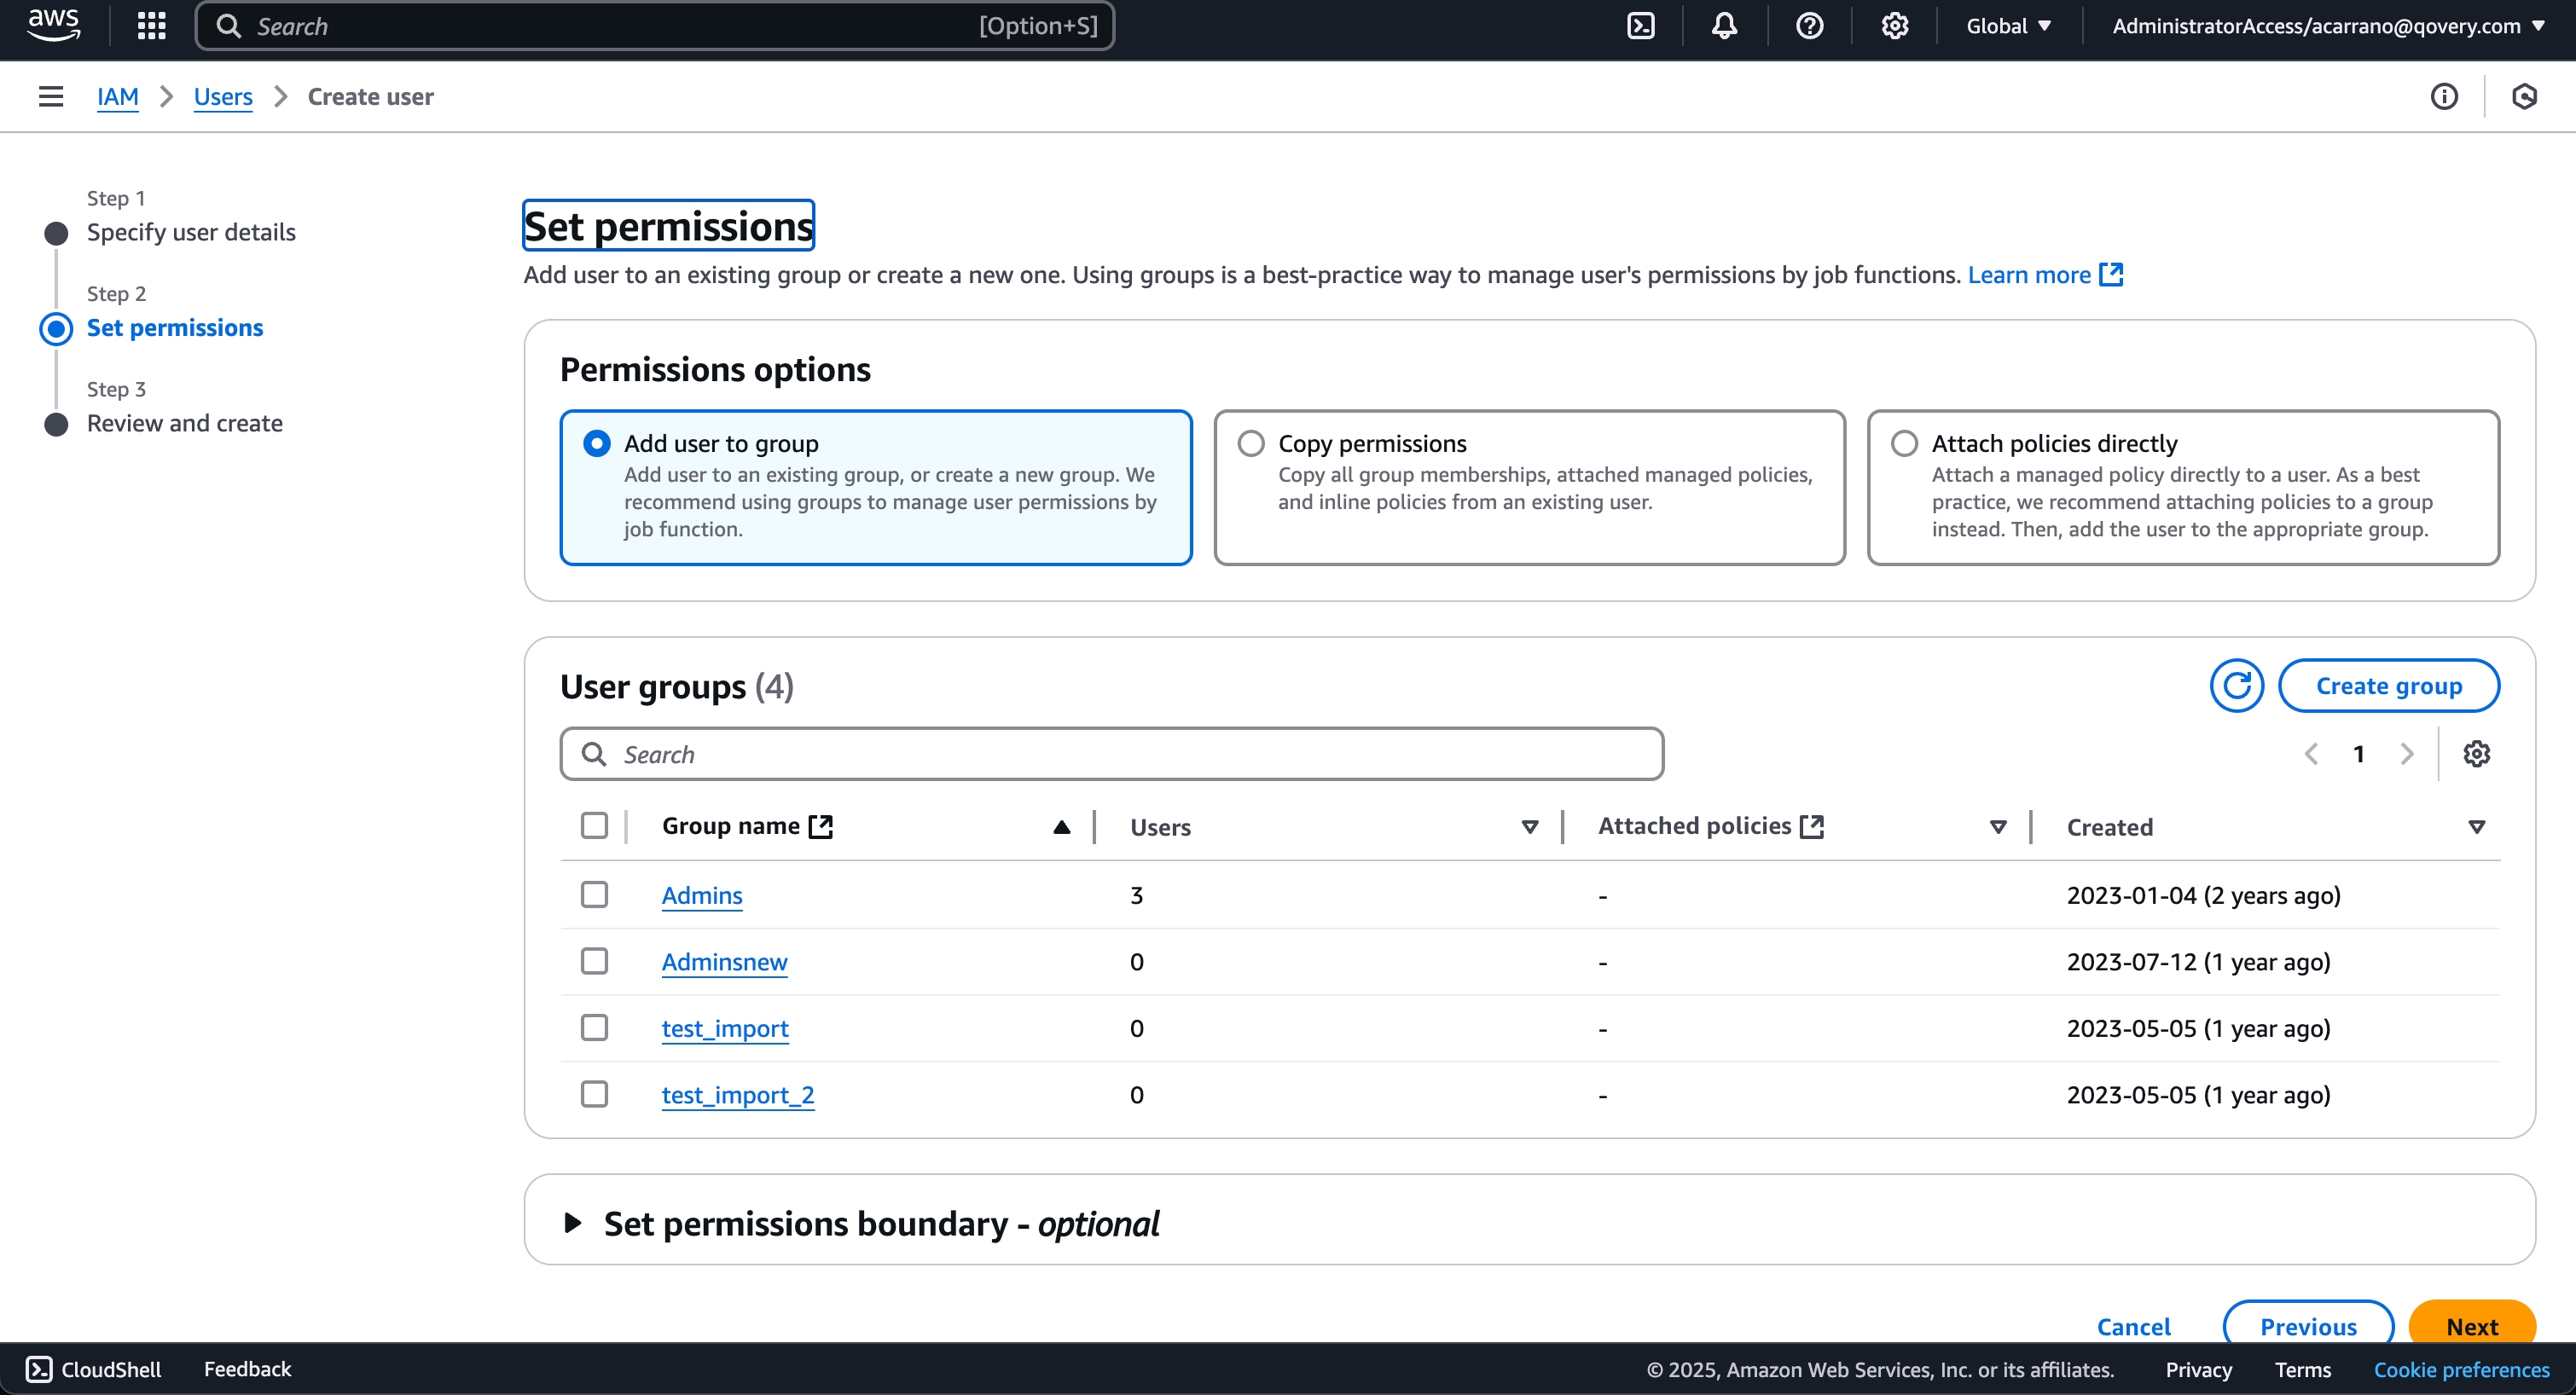
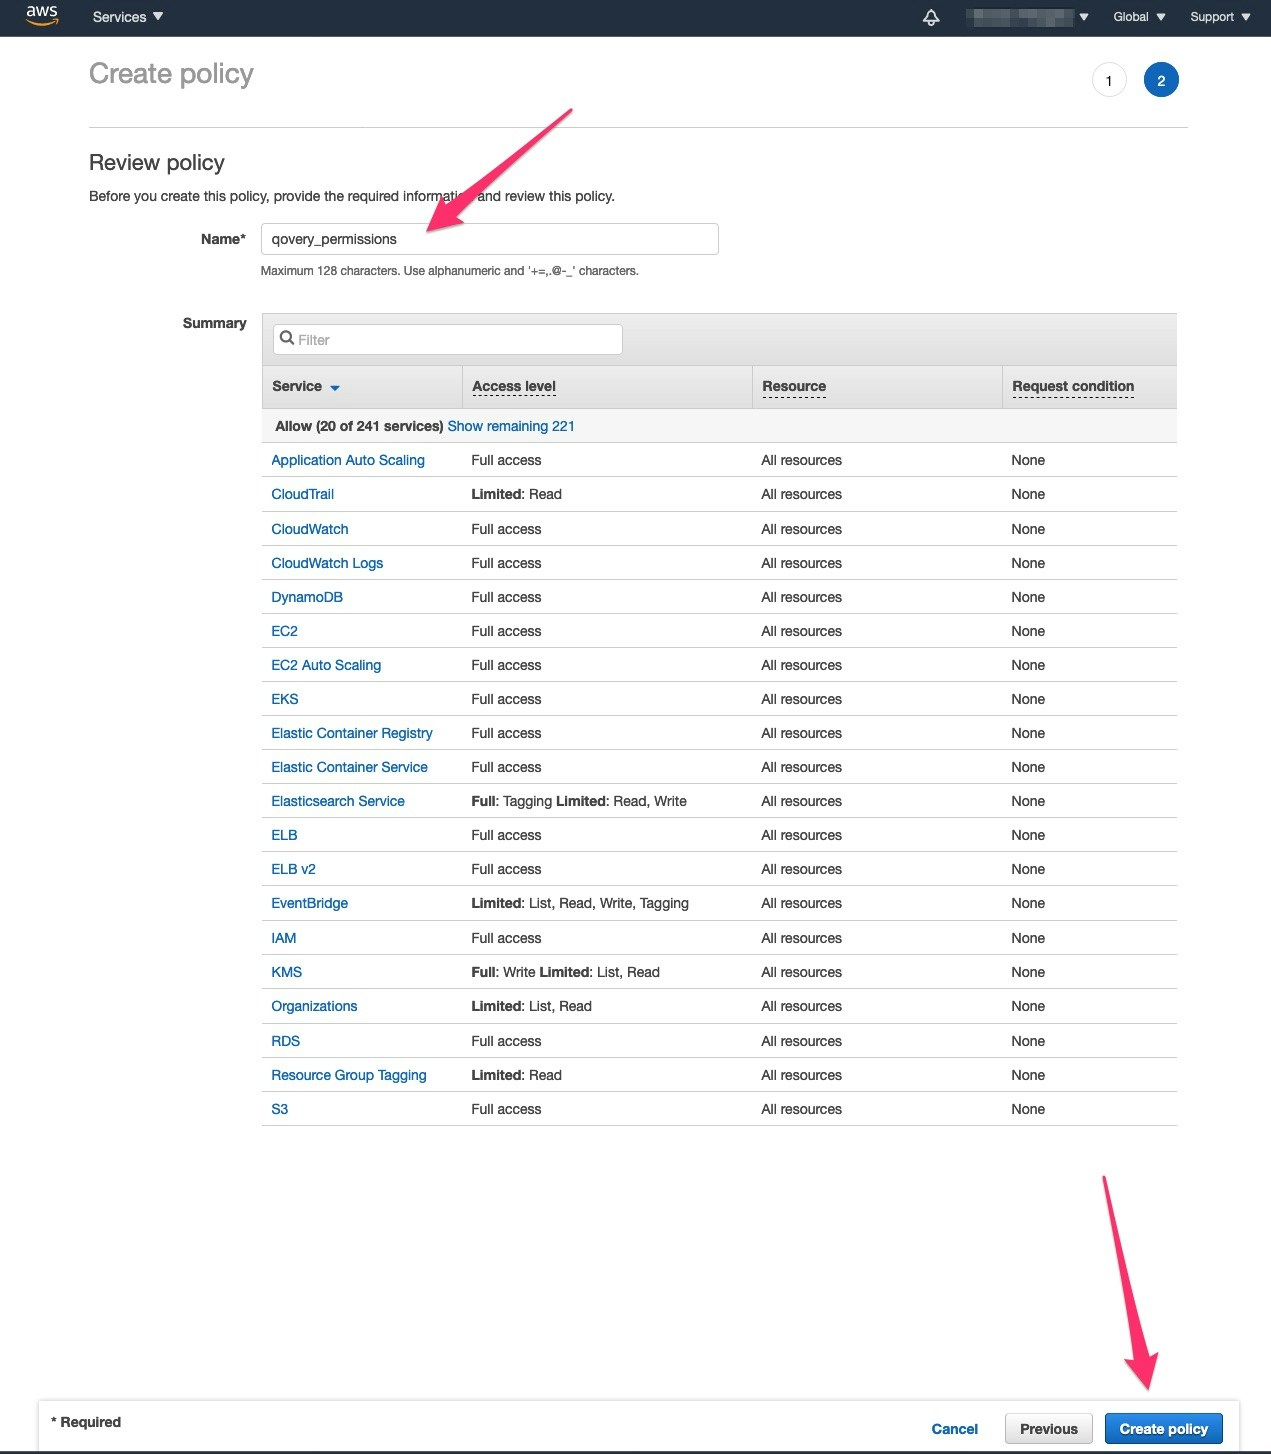
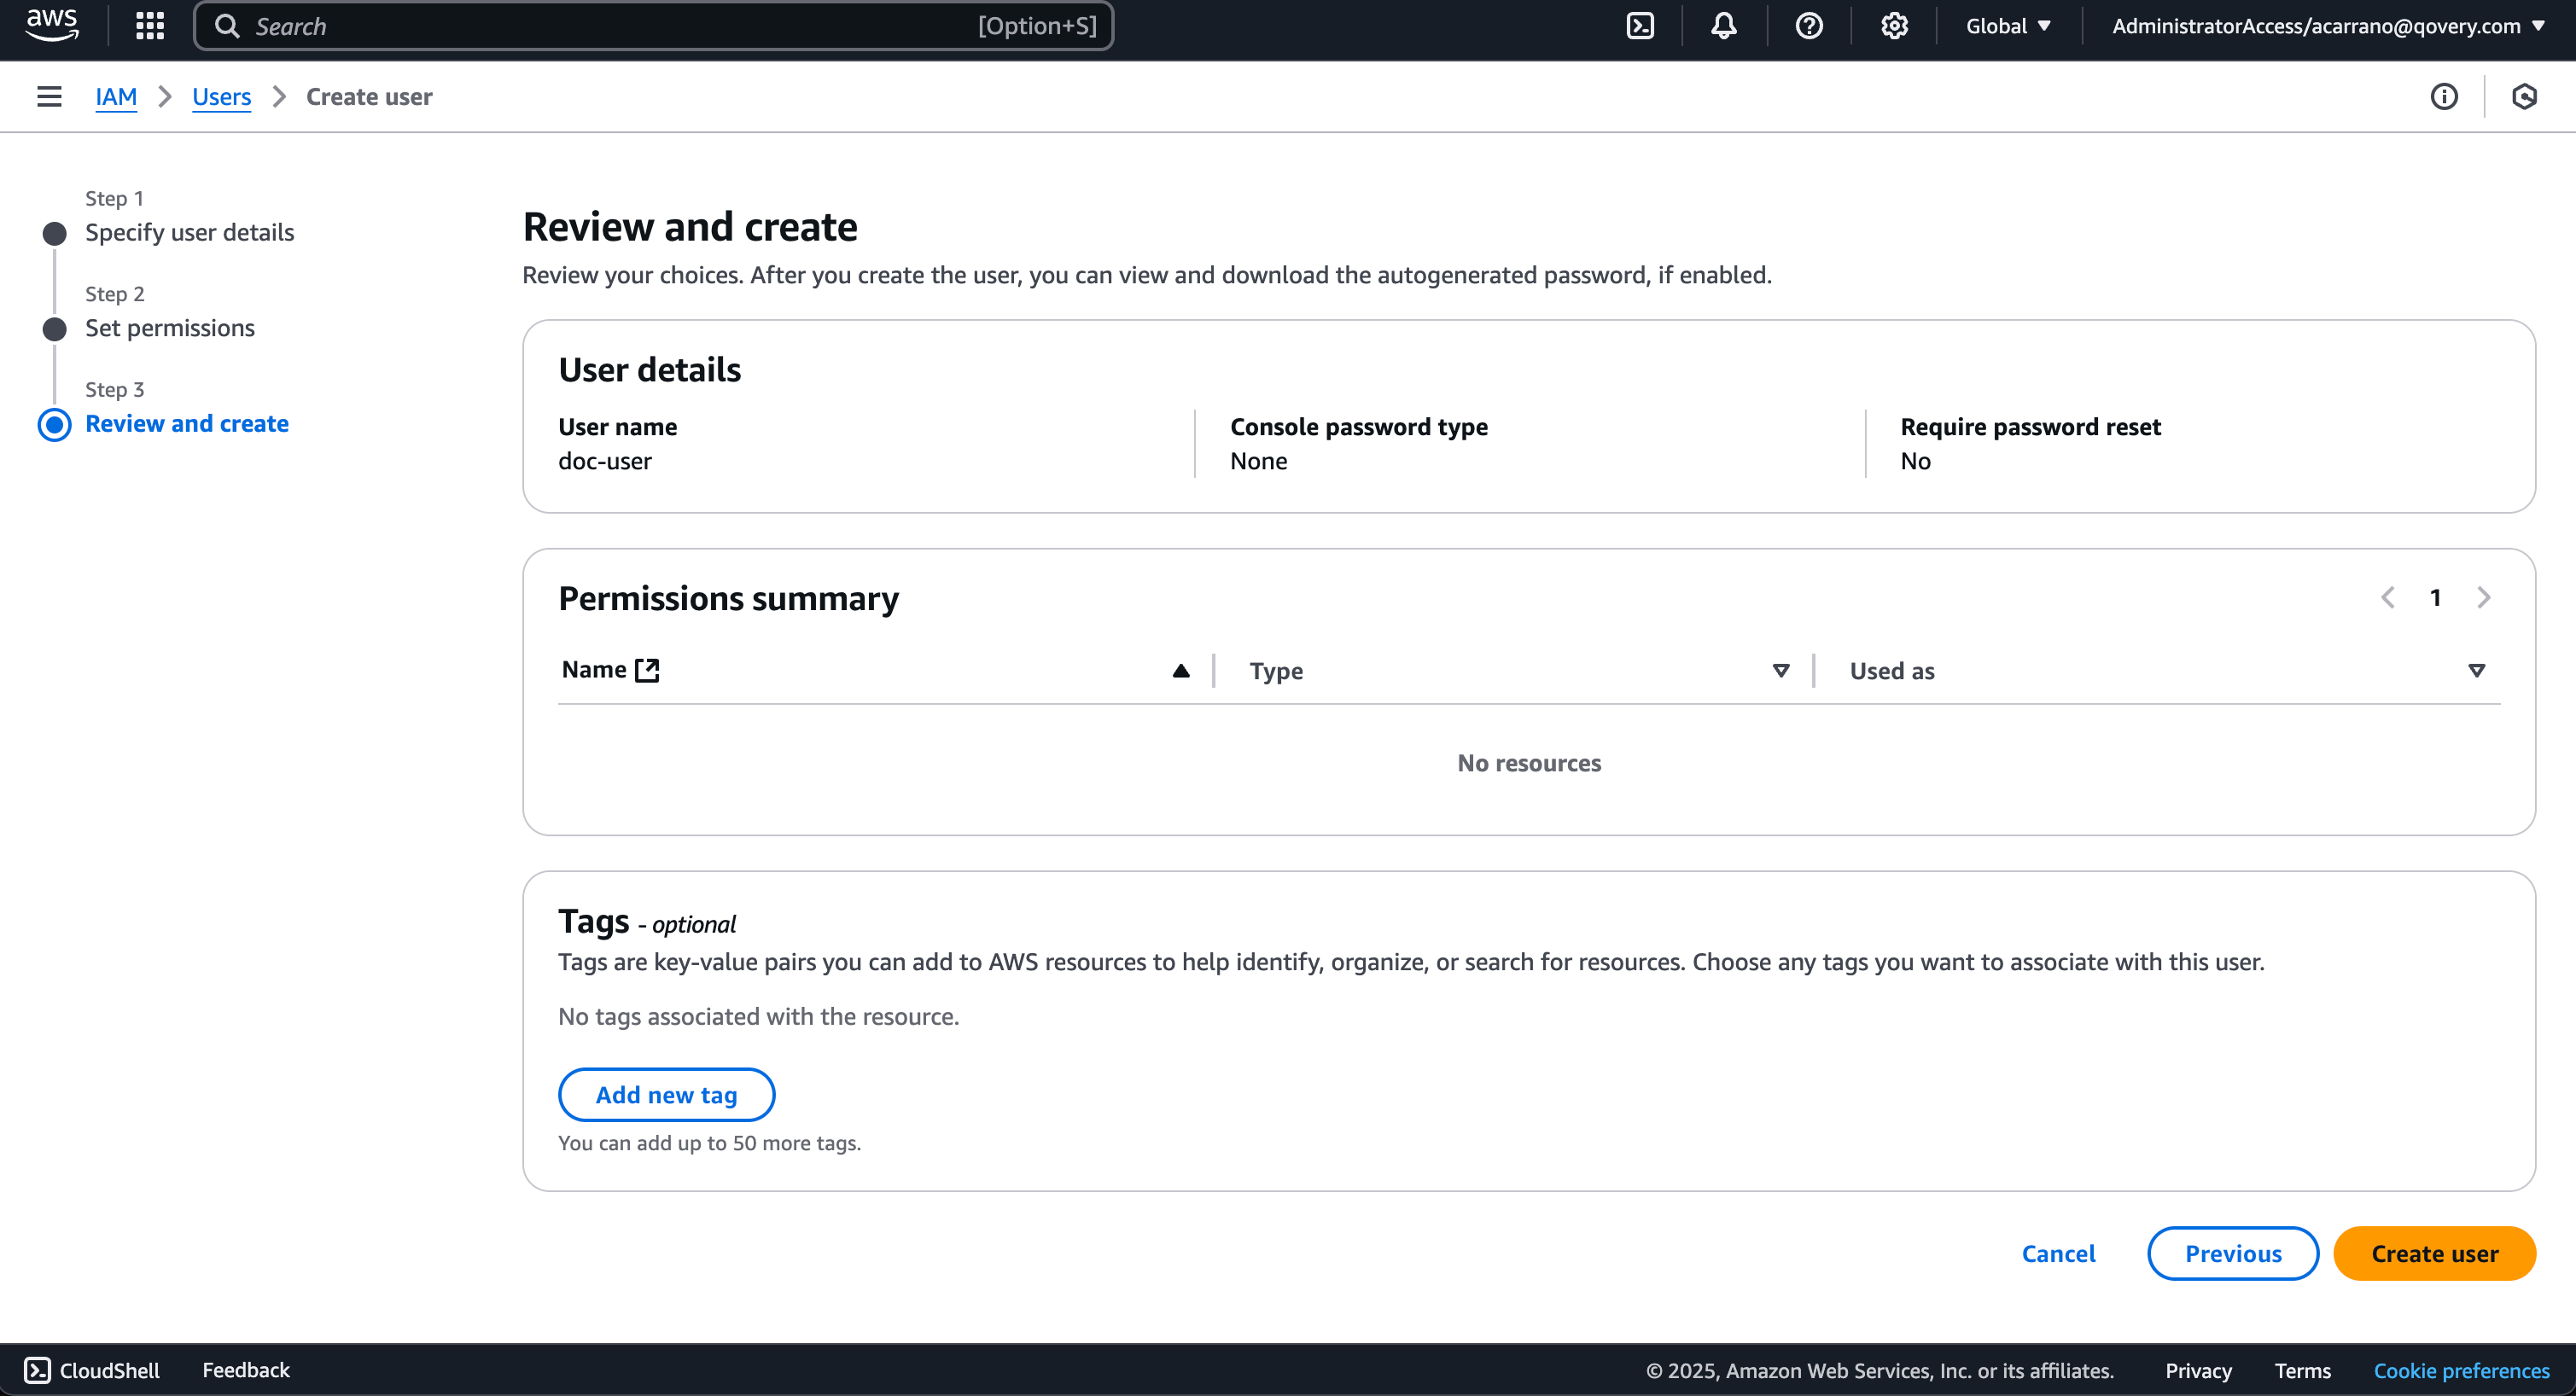 4. **Setup IAM Permissions**:
* Apply the required [IAM permissions](https://www.qovery.com/docs/files/qovery-iam-aws.json) to the `qovery` user
**Download**: [IAM permissions JSON](https://www.qovery.com/docs/files/qovery-iam-aws.json)
***
Or copy the policy from below:
```json theme={null}
{
"Version": "2012-10-17",
"Statement": [
{
"Effect": "Allow",
"Action": [
"iam:*",
"s3:ListAllMyBuckets",
"cloudwatch:*",
"autoscaling:*",
"application-autoscaling:*",
"elasticloadbalancing:*",
"organizations:DescribeAccount",
"organizations:DescribeOrganization",
"organizations:DescribeOrganizationalUnit",
"organizations:DescribePolicy",
"organizations:ListChildren",
"organizations:ListParents",
"organizations:ListPoliciesForTarget",
"organizations:ListRoots",
"organizations:ListPolicies",
"organizations:ListTargetsForPolicy",
"dynamodb:*",
"ecr:*",
"ec2:*",
"elasticache:*",
"cloudtrail:LookupEvents",
"dynamodb:*",
"tag:GetResources",
"rds:*",
"ecs:*",
"eks:*",
"logs:*",
"events:DescribeRule",
"events:DeleteRule",
"events:ListRuleNamesByTarget",
"events:ListTargetsByRule",
"events:PutRule",
"events:PutTargets",
"es:AddTags",
"es:RemoveTags",
"es:ListTags",
"es:DeleteElasticsearchDomain",
"es:DescribeElasticsearchDomain",
"es:CreateElasticsearchDomain",
"events:RemoveTargets",
"kms:*",
"events:TagResource",
"events:UntagResource",
"events:ListTagsForResource"
],
"Resource": "*"
},
{
"Action": [
"s3:*",
"sqs:*"
],
"Effect": "Allow",
"Resource": [
"arn:aws:s3:::qovery*",
"arn:aws:s3:::qovery*/*",
"arn:aws:sqs:*:*:qovery*",
"arn:aws:sqs:*:*:qovery*/*"
]
}
]
}
```
**Follow the steps in AWS console to create AWS credentials with required IAM permissions:**
4. **Setup IAM Permissions**:
* Apply the required [IAM permissions](https://www.qovery.com/docs/files/qovery-iam-aws.json) to the `qovery` user
**Download**: [IAM permissions JSON](https://www.qovery.com/docs/files/qovery-iam-aws.json)
***
Or copy the policy from below:
```json theme={null}
{
"Version": "2012-10-17",
"Statement": [
{
"Effect": "Allow",
"Action": [
"iam:*",
"s3:ListAllMyBuckets",
"cloudwatch:*",
"autoscaling:*",
"application-autoscaling:*",
"elasticloadbalancing:*",
"organizations:DescribeAccount",
"organizations:DescribeOrganization",
"organizations:DescribeOrganizationalUnit",
"organizations:DescribePolicy",
"organizations:ListChildren",
"organizations:ListParents",
"organizations:ListPoliciesForTarget",
"organizations:ListRoots",
"organizations:ListPolicies",
"organizations:ListTargetsForPolicy",
"dynamodb:*",
"ecr:*",
"ec2:*",
"elasticache:*",
"cloudtrail:LookupEvents",
"dynamodb:*",
"tag:GetResources",
"rds:*",
"ecs:*",
"eks:*",
"logs:*",
"events:DescribeRule",
"events:DeleteRule",
"events:ListRuleNamesByTarget",
"events:ListTargetsByRule",
"events:PutRule",
"events:PutTargets",
"es:AddTags",
"es:RemoveTags",
"es:ListTags",
"es:DeleteElasticsearchDomain",
"es:DescribeElasticsearchDomain",
"es:CreateElasticsearchDomain",
"events:RemoveTargets",
"kms:*",
"events:TagResource",
"events:UntagResource",
"events:ListTagsForResource"
],
"Resource": "*"
},
{
"Action": [
"s3:*",
"sqs:*"
],
"Effect": "Allow",
"Resource": [
"arn:aws:s3:::qovery*",
"arn:aws:s3:::qovery*/*",
"arn:aws:sqs:*:*:qovery*",
"arn:aws:sqs:*:*:qovery*/*"
]
}
]
}
```
**Follow the steps in AWS console to create AWS credentials with required IAM permissions:**
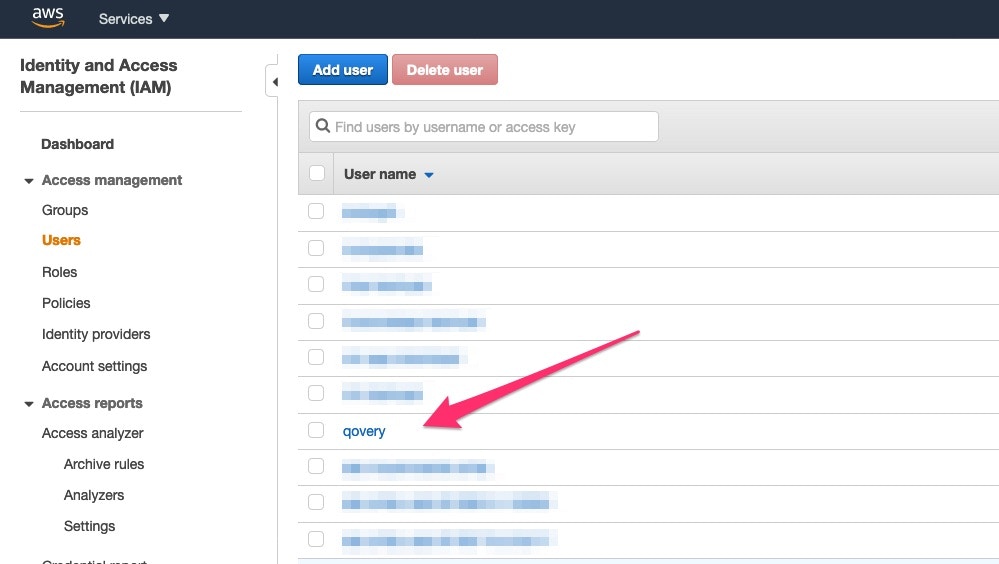
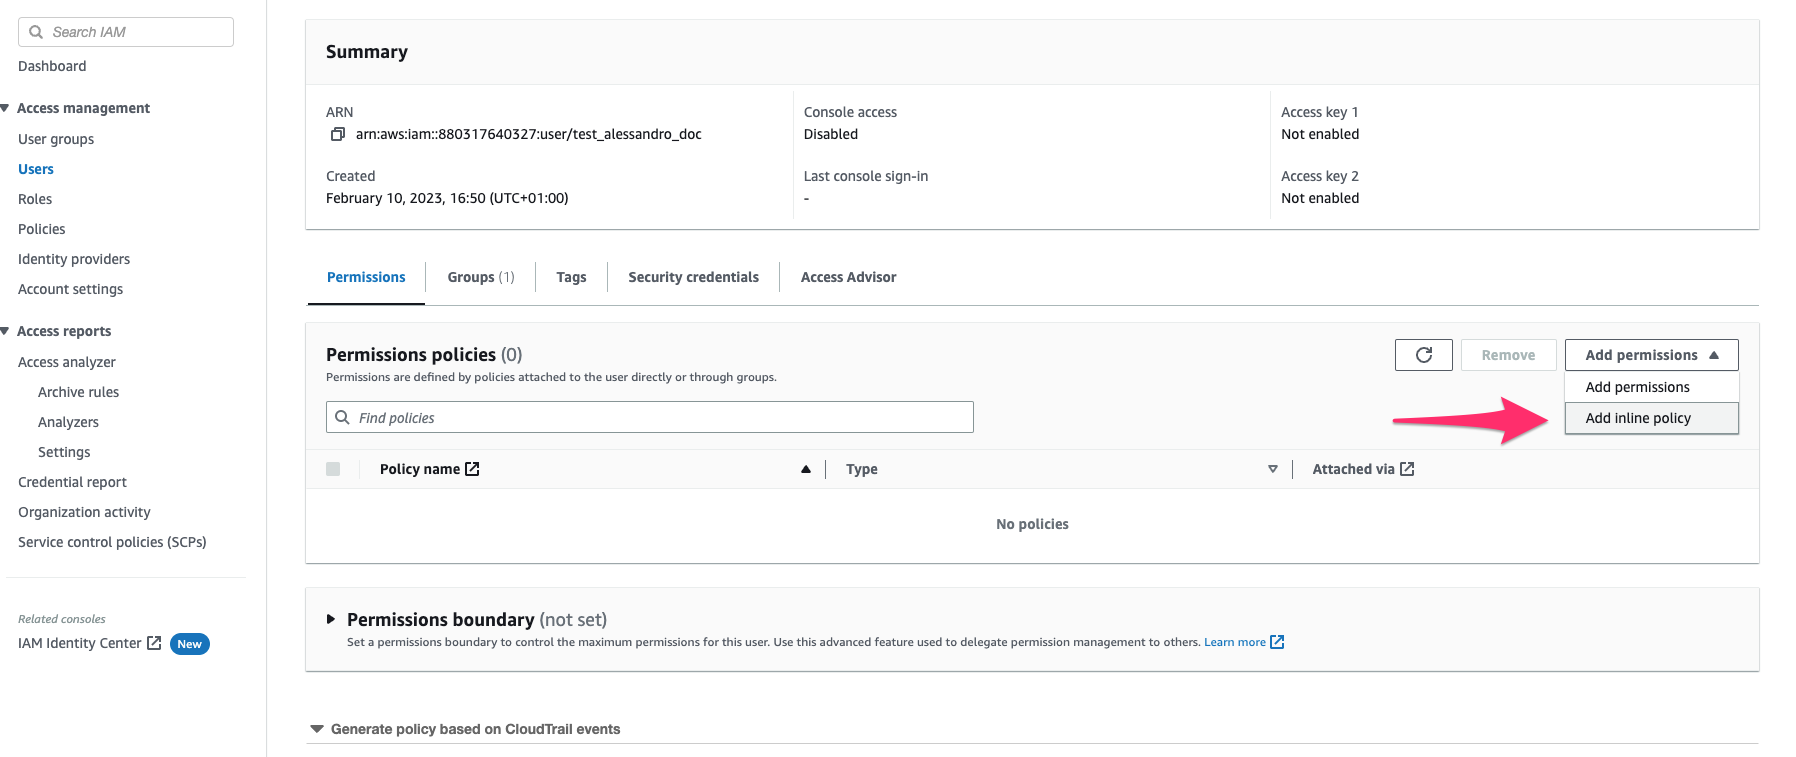
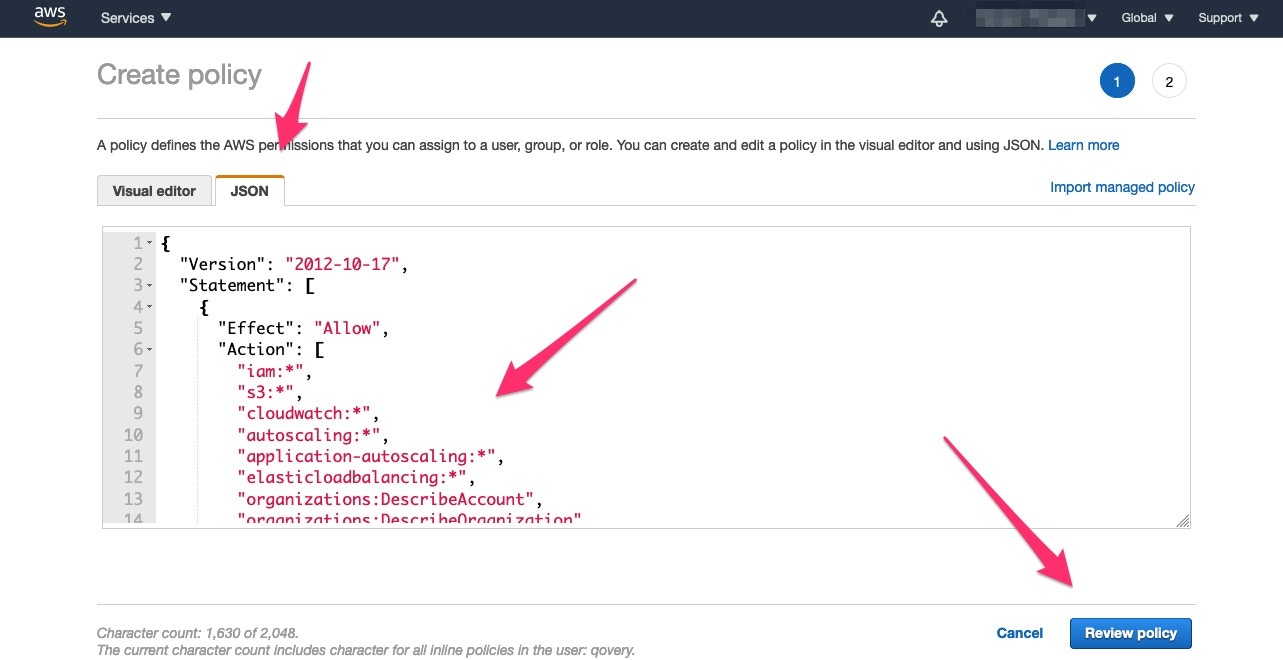
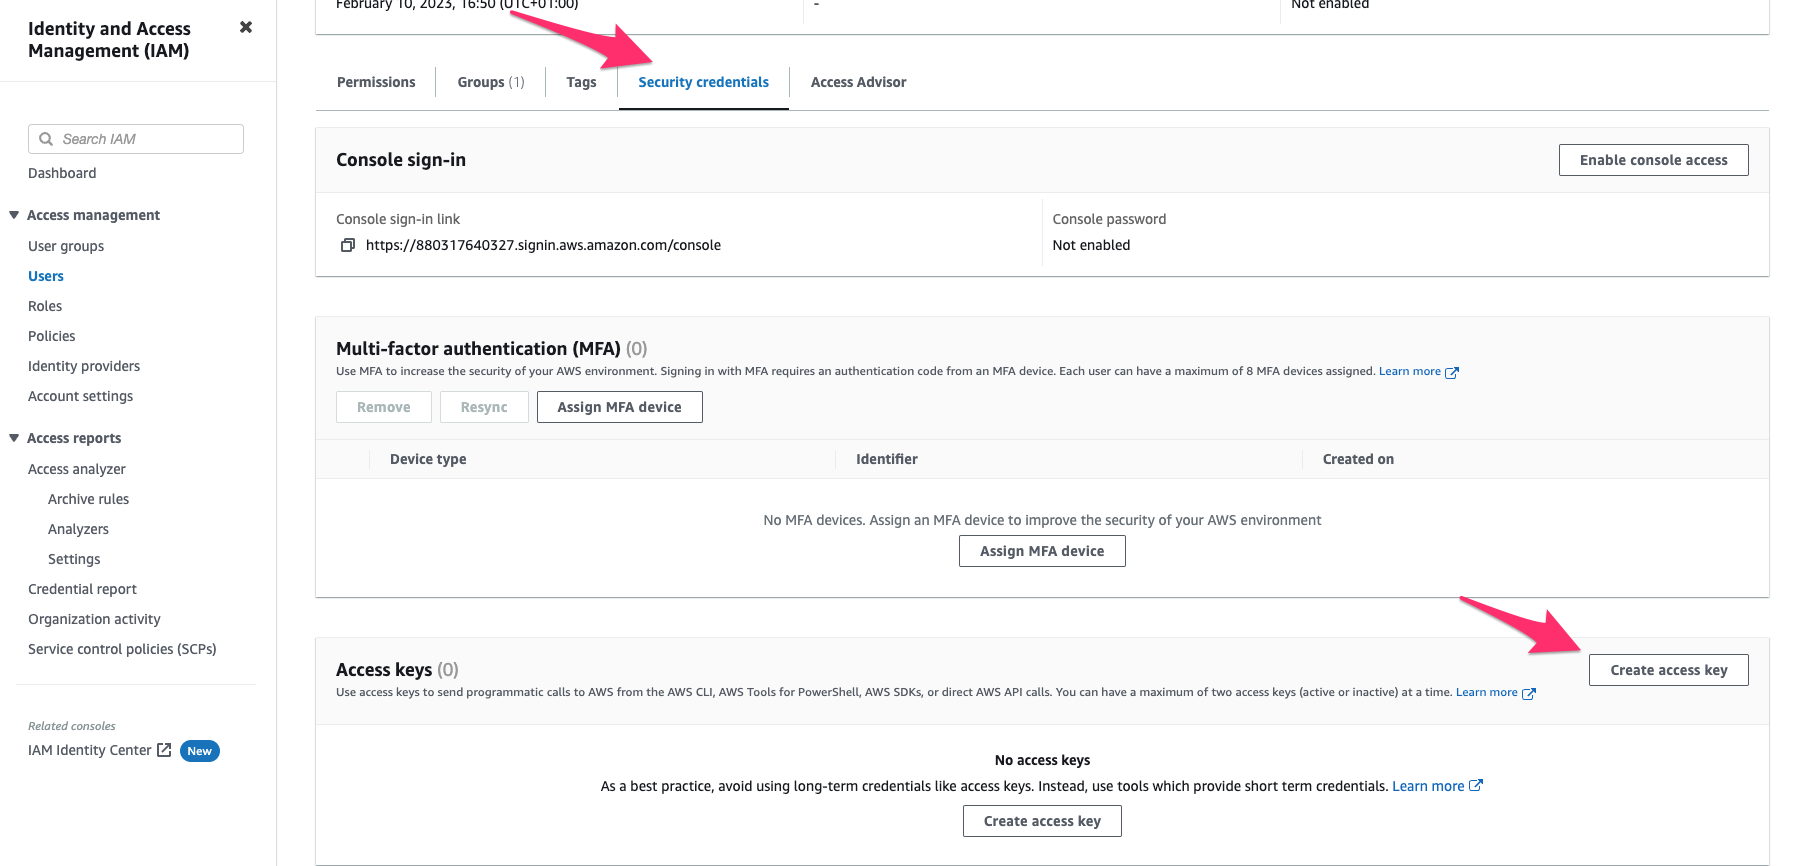
 5. **Create Access Keys**:
* Go to the **Security Credentials** tab of the `qovery` user
* Click **Create access key**
5. **Create Access Keys**:
* Go to the **Security Credentials** tab of the `qovery` user
* Click **Create access key**
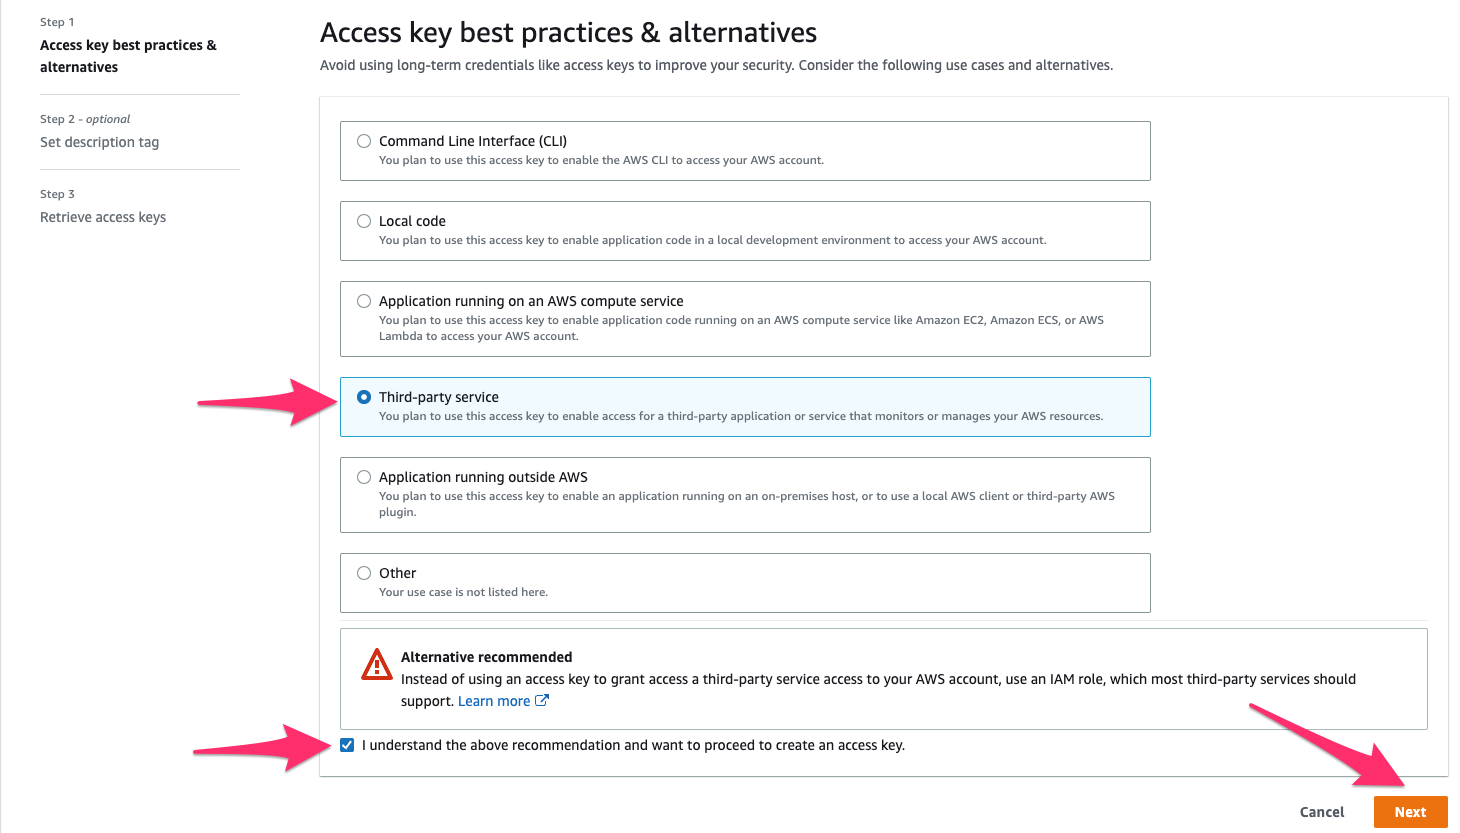
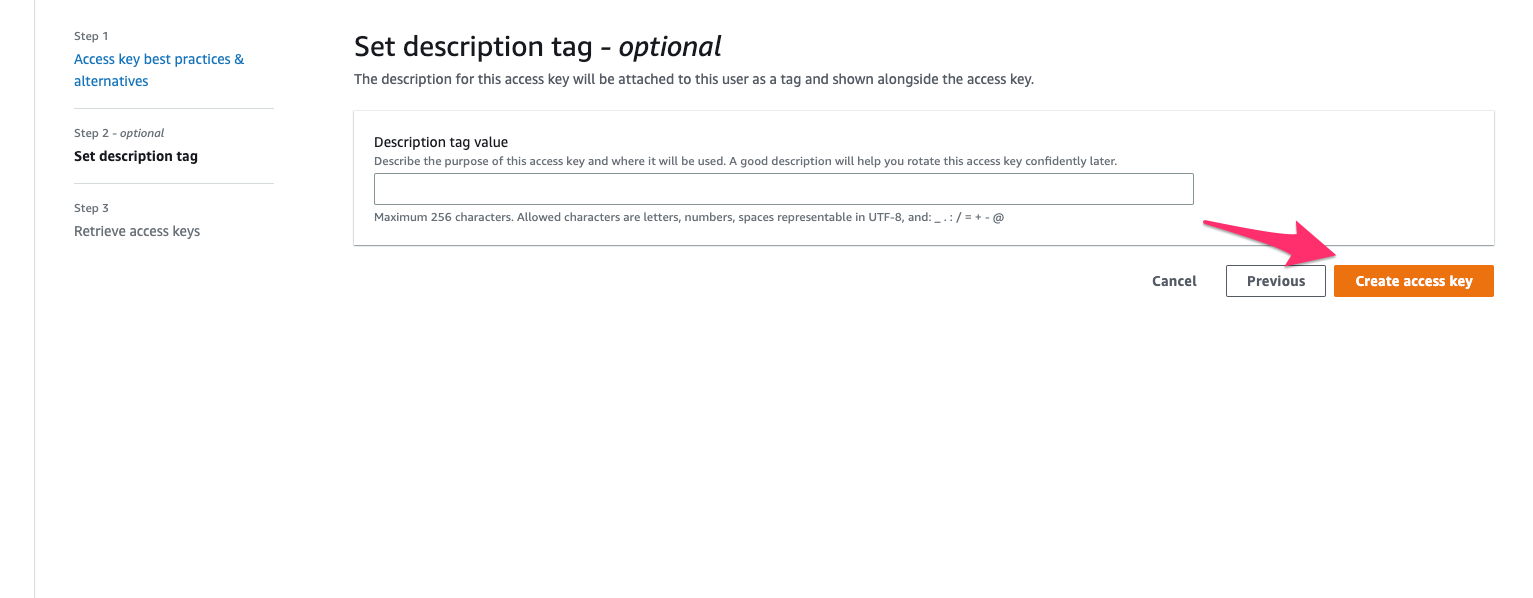 * Save the **Access Key ID** and **Secret Access Key**
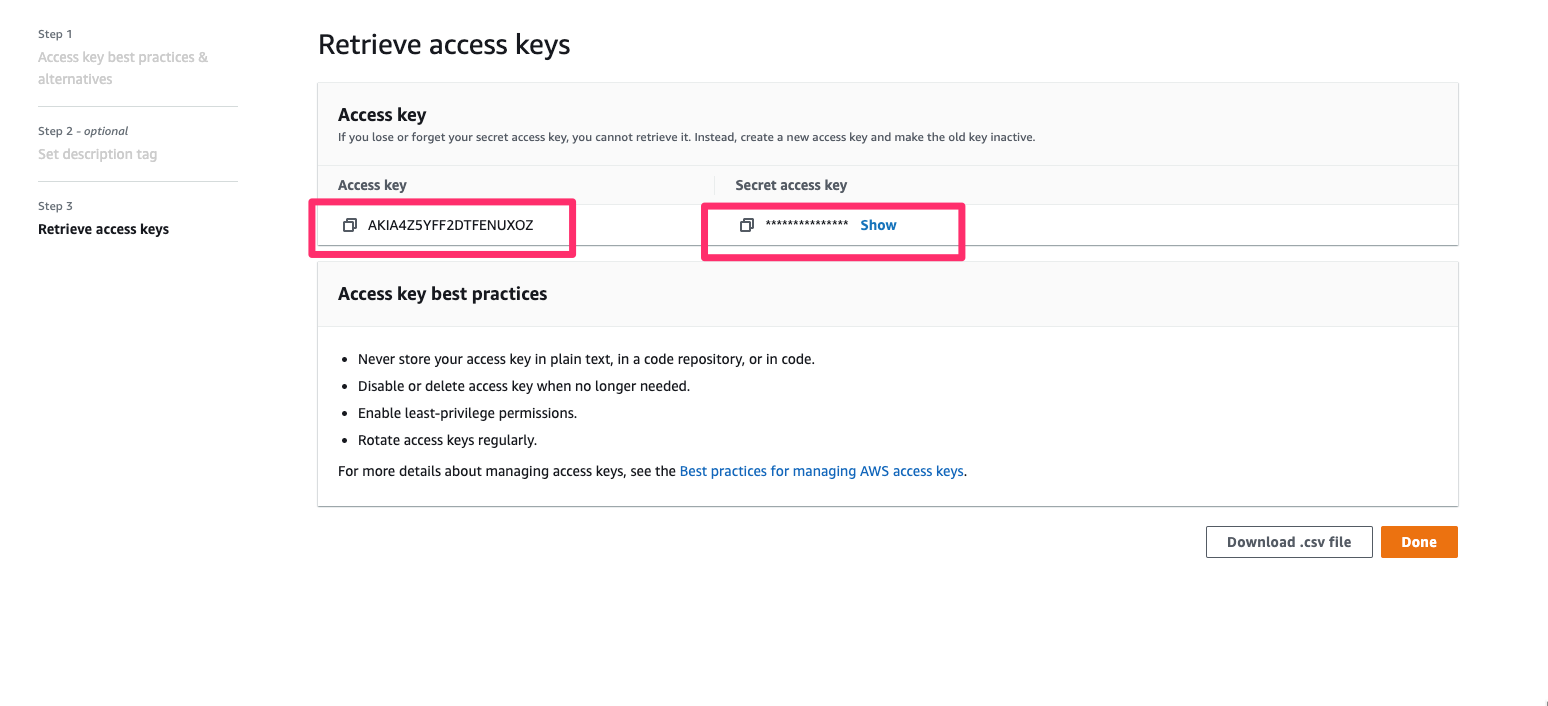 **Well done!** You now have your AWS `access key id` and `secret access key` and your permissions are set up.
### Create the Cluster
Click on `AWS` as hosting mode and then `Qovery Managed` option.
In the `Create Cluster` window enter:
* **Cluster name**: enter the name of your choice for your cluster.
* **Description**: enter a description to identify better your cluster.
* **Production cluster**: select this option if your cluster will be used for production.
* **Region**: select the geographical area in which you want your cluster to be hosted.
* **Credentials**: select one of the existing cloud provider credentials or create new credentials using the section above.
To confirm, click `Next`.
In the `Set Resources` window, select:
* **Node disk size (GB)**: Specify the disk capacity allocated per worker node, determining the amount of data each node can store. The minimum value is 20GB.
* **Instance types scopes**: By editing it, you can apply different filters to the node architectures, categories, families, and sizes. On the right, you can view all the instance types that match the applied filters. This means Karpenter will be able to spawn nodes on any of the listed instance types.
* **Architectures**: by default both `AMD64` and `ARM64` architectures are selected.
* **Default build architecture**: by default `AMD64`. If you build your application with the Qovery CI, your application will be built using this architecture by default.
* **Families**: by default all families are selected.
* **Sizes**: by default all sizes are selected.
* **Spot instances**: In order to reduce even more your costs, you can also enable the spot instances on your clusters. Spot instances cost up to 90% less compared to On-Demand prices. But keep in mind that spot instances can be terminated by the cloud provider at any time. Check this [documentation](https://aws.amazon.com/ec2/spot/) for more information. Even if this flag is enabled, the statefulsets and Nginx controller won't run on spot instances.
* **Enable GPU Nodepool configuration**: If you want to run GPU workloads on your cluster, you can enable this option to create a dedicated nodepool for GPU instances. You will then be able to select the GPU instance types you want to use on this nodepool. To enable spot instances, toggle the spot instance flag.
Instance type selection from your Qovery Console has direct consequences on your cloud provider's bill. While Qovery allows you to switch to a different instance type whenever you want, it is your sole responsibility to keep an eye on your infrastructure costs, especially when you want to upsize.
Please be aware that changing the instance type or disk size might cause a downtime for your service.
For more information on the instance types provided by each cloud provider and their associated pricing, see [What are the different instance types available when creating a cluster?](/configuration/clusters#what-are-the-different-instance-types-available-when-creating-a-cluster)
Also, before downsizing, you need to ensure that your applications will still have enough resources to run correctly.
To confirm, click `Next`.
In the `Network` step, select the network mode you want to enable on your cluster.
If you want to manage the network layer of your cluster by yourself, you can switch Network mode to `Self-managed` to use your own VPC instead of the one provided by Qovery.
These options can only be configured during cluster creation and cannot be modified later.
### Static IP
By default, when your cluster is created, its worker nodes are allocated public IP addresses, which are used for external communication. For improved security and control, the **Static IP** feature allows you to ensure that outbound traffic from your cluster uses specific IP addresses.
Here is what will be deployed on your cluster:
* Nat Gateways
* Elastic IPs
* Private subnets
Once set up, here is the procedure to find your static IP addresses on `AWS`:
* On your AWS account, select the VPC service.
* On the left menu, you'll find Elastic IP addresses. Once on it, in the Allocated IPv4 address column, you'll have your public IPs.
If you work in a sensitive business area such as financial technology, enabling the **Static IP** feature can help fulfil the security requirements of some of the external services you use, therefore making it easier for you to get whitelisted by them.
This feature has been activated by default. Since February 1, 2024, AWS charge public IPv4 Addresses. Disabling it may cost you more, depending on the number of nodes in your cluster. Check this [link](https://aws.amazon.com/blogs/aws/new-aws-public-ipv4-address-charge-public-ip-insights/) for more information.
### Custom VPC Subnet
Virtual Private Cloud (VPC) peering allows you to set up a connection between your Qovery VPC and another VPC on your AWS account. This way, you can access resources stored on your AWS VPC directly from your Qovery applications.
A VPC can only be used if it has at least one range of IP addresses called a **subnet**. When you create a cluster, Qovery automatically picks a default subnet for it. However, to perform VPC peering, you may want to define which specific VPC subnet you want to use, so that you can avoid any conflicting settings. To do so, you can enable the **Custom VPC Subnet** feature on your cluster. For more information on how to set up VPC peering, [see our dedicated tutorial](/configuration/integrations/aws/vpc-peering).
### Use Existing VPC
You have to specify the `VPC id` and ensure that in your VPC settings you have enabled the `DNS hostnames`.
Then you have to specify the different subnets ids:
**EKS**:
The EKS subnets are mandatory, you have to specify at least **one subnet id per zone** and ensure you have enabled the **auto-assign public IPv4 address** setting on your subnets.
You'll also need to set up the following labels on your subnets:
* On public subnets: add a label `kubernetes.io/role/elb` with the value `1` to allow the ALB controller to run on this subnet.
* On private subnets: add a label `kubernetes.io/role/internal-elb` with the value `1` to allow the ALB controller to run on this subnet.
* On all subnets: add a label `kubernetes.io/cluster/` with the value `shared` to allow the ALB controller to run on this subnet.
**Managed databases**:
This section is exclusively for enabling managed databases (container databases will be enabled by default).
Depending on the managed databases you want to you use (**MongoDB**, **RDS:MySQL/PostgreSQL** and **Redis**), specify at least one subnet id per zone.
In the `Ready to install your cluster` window, check that the services needed to install your cluster are correct.
You can now press the `Create and Install` button.
Your cluster is now displayed in your organization settings, featuring the `Installing...` status (orange status). Once your cluster is properly installed, its status turns to green and you will be able to deploy your applications on it.
You can follow the execution of the action via the cluster status and/or by accessing the [Cluster Logs](/configuration/clusters#logs)
## Migrating from AWS with auto-scaler to AWS with Karpenter
### Requirements
Please check carefully the following requirements to ensure a successful
migration with the minimum downtime.
A SQS queue will be created. Update the IAM permissions of the Qovery user: make sure to use the [latest version here](https://www.qovery.com/docs/files/qovery-iam-aws.json) to add the permission on SQS.
Your cluster should use the [Instance Metadata Service Version 2](https://docs.aws.amazon.com/AWSEC2/latest/UserGuide/configuring-instance-metadata-service.html): make sure to set the `aws.eks.ec2.metadata_imds` cluster advanced settings to `required` if not already set (more details [here](/configuration/cluster-advanced-settings#awseksec2metadata_imds)).
Redeploy your cluster before enabling Karpenter to apply the advanced setting change.
If some of your services are using the Instance Metadata Service Version 1, you must first update them to support the Version 2.
If you have configured an existing vpc for your cluster, you'll need to
indicate some additional subnets dedicated to fargate: \* those subnets must be
**private** \* they must all have access to internet through a NAT gateway
If you have deployed some daemonsets, you must update their definitions to enable them to run on every node of the future nodepools (stable, default, and cronjob if enabled). Everything is explained in [our guide](/getting-started/guides/advanced-tutorials/deploy-daemonset-karpenter)
## Managing your Cluster Settings
To manage the settings of an existing cluster:
Open your [Qovery Console](https://console.qovery.com).
Click on the Clusters tab.
To access your cluster settings, click on the settings tab.
Below you can find a description of each section
### General
The `General` tab allows you to define high-level information on your cluster:
| Item | Description |
| ------------------ | ----------------------------------------------------- |
| Cluster Name | To edit the name of your cluster. |
| Description | To enter or edit the description of your cluster. |
| Production Cluster | To enter or edit the production flag of your cluster. |
### Credentials
Here you can manage here the cloud provider credentials associated with your cluster.
If you need to change the credentials:
* generate a new set of credentials on your cloud provider ([Procedure for AWS account](/installation/aws#connect-aws-account))
* create the new credential on the Qovery by opening the drop-down and selecting "New Credentials"
Once created and associated, you need to [update your cluster](/configuration/clusters#updating-a-cluster) to apply the change.
### Resources
Qovery deploys two node pools by default:
* **Stable node pool**: Used for single instances and internal Qovery applications. For example, any containerized databases or application having the number of minimum instances set to 1, will be deployed on this nodepool. On this nodepool the consolidation is deactivated by default.
* **Default node pool**: Designed to handle general workloads and serves as the foundation for deploying most applications.
Additional optional node pools can be enabled:
* **GPU node pool**: Can be enabled if you want to run GPU workloads on your cluster. You can select the GPU instance types you want to use on this nodepool.
* **Cronjob node pool**: A dedicated node pool for Qovery cron jobs. When enabled, a Karpenter NodePool named `cronjob` is created with a `nodepool/cronjob: NoSchedule` taint. Qovery cron jobs automatically receive the appropriate toleration and a required node affinity toward this nodepool, so they always run there. This helps isolate cronjob workloads from long-running services on shared nodes. The cronjob nodepool supports consolidation scheduling and resource limits (same as the stable nodepool). The node affinity is required (hard): whenever you enable or disable this nodepool, **you must redeploy every cron job** so they pick up the updated scheduling configuration. There is no automatic fallback to the default node pool. Cron jobs deployed before the nodepool was enabled will not run on it until they are redeployed, and cron jobs deployed while the nodepool was enabled will stay in `Pending` if the nodepool is later disabled and they are not redeployed.
#### Settings for nodepools:
* **Instance types**: Define the list of instance types that can be used. (Shared for Stable and Default nodepools)
* **Spot instances**: Enable or disable spot instances. (Shared across the three nodepools)
* **Node disk size (GB)**: Specify the disk capacity allocated per worker node, determining the amount of data each node can store. (Shared for Stable and Default nodepools)
* **Consolidation schedule** *(Stable and Cronjob nodepools only)*: Optimizes resource usage by consolidating workloads onto fewer nodes. This feature is not available for the default nodepool, as consolidation can happen at any time. We recommend enabling this option; otherwise, nodes will never be consolidated, leading to unnecessary infrastructure costs.
* **Node pool limits**: Configure CPU and memory limits to ensure nodes stay within defined resource constraints, preventing excessive costs.
Instance type selection from your Qovery Console has direct consequences on your cloud provider's bill. While Qovery allows you to switch to a different instance type whenever you want, it is your sole responsibility to keep an eye on your infrastructure costs, especially when you want to upsize.
For more information on the instance types provided by each cloud provider and their associated pricing, see [What are the different instance types available when creating a cluster?](/configuration/clusters#what-are-the-different-instance-types-available-when-creating-a-cluster)
### Mirroring registry
In this tab, you will see that a container registry already exist (called `registry-{$UIID}`).
This is your cloud provider container registry used by Qovery to manage the deployment of your applications by mirroring the docker images.
The credentials configured on this registry are the one used to create the cluster. But you can still update them if you prefer to manage them separately (dedicated pair of creds just to access the registry).
Check [this link](/configuration/deployment/image-mirroring) for more information.
### Network
The `Network` tab in your cluster settings allows you to:
* check if the [**Static IP**](#static-ip), [**Custom VPC subnet**](#custom-vpc-subnet), [**Deploy on existing VPC**](#use-your-existing-vpc) features are enabled on your cluster. The enabled features cannot be changed after the creation of the cluster.
* Update your Qovery VPC route table so that you can perform VPC peering. For step-by-step guidelines on how to set up VPC peering, [see our dedicated tutorial](/configuration/integrations/aws/vpc-peering).
## Defining cluster node constraints to run your Services
### Define if your service can run on an on-demand instance
When using spot instances in your cluster, you may want to ensure that certain critical services, such as databases or essential applications, are always deployed on on-demand instances.
To specify that a service should be deployed on an `on-demand` instance, manually set the `deployment.affinity.node.required` advanced setting to:
```json theme={null}
{ "karpenter.sh/capacity-type": "on-demand" }
```
### Define the instance type to run your service
In some cases, you may need to ensure that a specific service runs on a particular instance type to meet performance, compliance, or cost requirements.
For example, to assign a service to the t3a.xlarge instance type, manually set the `deployment.affinity.node.required` advanced setting to:
```json theme={null}
{ "node.kubernetes.io/instance-type": "t3a.xlarge" }
```
The specified instance type must be included in the list of instance types
defined in the [NodePool configuration](#resources).
### Change the node pool of your service when using Helm
When using Helm, you can update the `affinity` field in your `values.yaml` file to target a specific node pool for your service. For example you can switch from the `default` to the `stable` nodepool:
```yaml theme={null}
affinity:
nodeAffinity:
requiredDuringSchedulingIgnoredDuringExecution:
nodeSelectorTerms:
- matchExpressions:
- key: karpenter.sh/nodepool
operator: In
values:
- stable
```
And you also have to add tolerations:
```yaml theme={null}
tolerations:
- effect: NoSchedule
key: nodepool/stable
operator: Exists
```
**Well done!** You now have your AWS `access key id` and `secret access key` and your permissions are set up.
### Create the Cluster
Click on `AWS` as hosting mode and then `Qovery Managed` option.
In the `Create Cluster` window enter:
* **Cluster name**: enter the name of your choice for your cluster.
* **Description**: enter a description to identify better your cluster.
* **Production cluster**: select this option if your cluster will be used for production.
* **Region**: select the geographical area in which you want your cluster to be hosted.
* **Credentials**: select one of the existing cloud provider credentials or create new credentials using the section above.
To confirm, click `Next`.
In the `Set Resources` window, select:
* **Node disk size (GB)**: Specify the disk capacity allocated per worker node, determining the amount of data each node can store. The minimum value is 20GB.
* **Instance types scopes**: By editing it, you can apply different filters to the node architectures, categories, families, and sizes. On the right, you can view all the instance types that match the applied filters. This means Karpenter will be able to spawn nodes on any of the listed instance types.
* **Architectures**: by default both `AMD64` and `ARM64` architectures are selected.
* **Default build architecture**: by default `AMD64`. If you build your application with the Qovery CI, your application will be built using this architecture by default.
* **Families**: by default all families are selected.
* **Sizes**: by default all sizes are selected.
* **Spot instances**: In order to reduce even more your costs, you can also enable the spot instances on your clusters. Spot instances cost up to 90% less compared to On-Demand prices. But keep in mind that spot instances can be terminated by the cloud provider at any time. Check this [documentation](https://aws.amazon.com/ec2/spot/) for more information. Even if this flag is enabled, the statefulsets and Nginx controller won't run on spot instances.
* **Enable GPU Nodepool configuration**: If you want to run GPU workloads on your cluster, you can enable this option to create a dedicated nodepool for GPU instances. You will then be able to select the GPU instance types you want to use on this nodepool. To enable spot instances, toggle the spot instance flag.
Instance type selection from your Qovery Console has direct consequences on your cloud provider's bill. While Qovery allows you to switch to a different instance type whenever you want, it is your sole responsibility to keep an eye on your infrastructure costs, especially when you want to upsize.
Please be aware that changing the instance type or disk size might cause a downtime for your service.
For more information on the instance types provided by each cloud provider and their associated pricing, see [What are the different instance types available when creating a cluster?](/configuration/clusters#what-are-the-different-instance-types-available-when-creating-a-cluster)
Also, before downsizing, you need to ensure that your applications will still have enough resources to run correctly.
To confirm, click `Next`.
In the `Network` step, select the network mode you want to enable on your cluster.
If you want to manage the network layer of your cluster by yourself, you can switch Network mode to `Self-managed` to use your own VPC instead of the one provided by Qovery.
These options can only be configured during cluster creation and cannot be modified later.
### Static IP
By default, when your cluster is created, its worker nodes are allocated public IP addresses, which are used for external communication. For improved security and control, the **Static IP** feature allows you to ensure that outbound traffic from your cluster uses specific IP addresses.
Here is what will be deployed on your cluster:
* Nat Gateways
* Elastic IPs
* Private subnets
Once set up, here is the procedure to find your static IP addresses on `AWS`:
* On your AWS account, select the VPC service.
* On the left menu, you'll find Elastic IP addresses. Once on it, in the Allocated IPv4 address column, you'll have your public IPs.
If you work in a sensitive business area such as financial technology, enabling the **Static IP** feature can help fulfil the security requirements of some of the external services you use, therefore making it easier for you to get whitelisted by them.
This feature has been activated by default. Since February 1, 2024, AWS charge public IPv4 Addresses. Disabling it may cost you more, depending on the number of nodes in your cluster. Check this [link](https://aws.amazon.com/blogs/aws/new-aws-public-ipv4-address-charge-public-ip-insights/) for more information.
### Custom VPC Subnet
Virtual Private Cloud (VPC) peering allows you to set up a connection between your Qovery VPC and another VPC on your AWS account. This way, you can access resources stored on your AWS VPC directly from your Qovery applications.
A VPC can only be used if it has at least one range of IP addresses called a **subnet**. When you create a cluster, Qovery automatically picks a default subnet for it. However, to perform VPC peering, you may want to define which specific VPC subnet you want to use, so that you can avoid any conflicting settings. To do so, you can enable the **Custom VPC Subnet** feature on your cluster. For more information on how to set up VPC peering, [see our dedicated tutorial](/configuration/integrations/aws/vpc-peering).
### Use Existing VPC
You have to specify the `VPC id` and ensure that in your VPC settings you have enabled the `DNS hostnames`.
Then you have to specify the different subnets ids:
**EKS**:
The EKS subnets are mandatory, you have to specify at least **one subnet id per zone** and ensure you have enabled the **auto-assign public IPv4 address** setting on your subnets.
You'll also need to set up the following labels on your subnets:
* On public subnets: add a label `kubernetes.io/role/elb` with the value `1` to allow the ALB controller to run on this subnet.
* On private subnets: add a label `kubernetes.io/role/internal-elb` with the value `1` to allow the ALB controller to run on this subnet.
* On all subnets: add a label `kubernetes.io/cluster/` with the value `shared` to allow the ALB controller to run on this subnet.
**Managed databases**:
This section is exclusively for enabling managed databases (container databases will be enabled by default).
Depending on the managed databases you want to you use (**MongoDB**, **RDS:MySQL/PostgreSQL** and **Redis**), specify at least one subnet id per zone.
In the `Ready to install your cluster` window, check that the services needed to install your cluster are correct.
You can now press the `Create and Install` button.
Your cluster is now displayed in your organization settings, featuring the `Installing...` status (orange status). Once your cluster is properly installed, its status turns to green and you will be able to deploy your applications on it.
You can follow the execution of the action via the cluster status and/or by accessing the [Cluster Logs](/configuration/clusters#logs)
## Migrating from AWS with auto-scaler to AWS with Karpenter
### Requirements
Please check carefully the following requirements to ensure a successful
migration with the minimum downtime.
A SQS queue will be created. Update the IAM permissions of the Qovery user: make sure to use the [latest version here](https://www.qovery.com/docs/files/qovery-iam-aws.json) to add the permission on SQS.
Your cluster should use the [Instance Metadata Service Version 2](https://docs.aws.amazon.com/AWSEC2/latest/UserGuide/configuring-instance-metadata-service.html): make sure to set the `aws.eks.ec2.metadata_imds` cluster advanced settings to `required` if not already set (more details [here](/configuration/cluster-advanced-settings#awseksec2metadata_imds)).
Redeploy your cluster before enabling Karpenter to apply the advanced setting change.
If some of your services are using the Instance Metadata Service Version 1, you must first update them to support the Version 2.
If you have configured an existing vpc for your cluster, you'll need to
indicate some additional subnets dedicated to fargate: \* those subnets must be
**private** \* they must all have access to internet through a NAT gateway
If you have deployed some daemonsets, you must update their definitions to enable them to run on every node of the future nodepools (stable, default, and cronjob if enabled). Everything is explained in [our guide](/getting-started/guides/advanced-tutorials/deploy-daemonset-karpenter)
## Managing your Cluster Settings
To manage the settings of an existing cluster:
Open your [Qovery Console](https://console.qovery.com).
Click on the Clusters tab.
To access your cluster settings, click on the settings tab.
Below you can find a description of each section
### General
The `General` tab allows you to define high-level information on your cluster:
| Item | Description |
| ------------------ | ----------------------------------------------------- |
| Cluster Name | To edit the name of your cluster. |
| Description | To enter or edit the description of your cluster. |
| Production Cluster | To enter or edit the production flag of your cluster. |
### Credentials
Here you can manage here the cloud provider credentials associated with your cluster.
If you need to change the credentials:
* generate a new set of credentials on your cloud provider ([Procedure for AWS account](/installation/aws#connect-aws-account))
* create the new credential on the Qovery by opening the drop-down and selecting "New Credentials"
Once created and associated, you need to [update your cluster](/configuration/clusters#updating-a-cluster) to apply the change.
### Resources
Qovery deploys two node pools by default:
* **Stable node pool**: Used for single instances and internal Qovery applications. For example, any containerized databases or application having the number of minimum instances set to 1, will be deployed on this nodepool. On this nodepool the consolidation is deactivated by default.
* **Default node pool**: Designed to handle general workloads and serves as the foundation for deploying most applications.
Additional optional node pools can be enabled:
* **GPU node pool**: Can be enabled if you want to run GPU workloads on your cluster. You can select the GPU instance types you want to use on this nodepool.
* **Cronjob node pool**: A dedicated node pool for Qovery cron jobs. When enabled, a Karpenter NodePool named `cronjob` is created with a `nodepool/cronjob: NoSchedule` taint. Qovery cron jobs automatically receive the appropriate toleration and a required node affinity toward this nodepool, so they always run there. This helps isolate cronjob workloads from long-running services on shared nodes. The cronjob nodepool supports consolidation scheduling and resource limits (same as the stable nodepool). The node affinity is required (hard): whenever you enable or disable this nodepool, **you must redeploy every cron job** so they pick up the updated scheduling configuration. There is no automatic fallback to the default node pool. Cron jobs deployed before the nodepool was enabled will not run on it until they are redeployed, and cron jobs deployed while the nodepool was enabled will stay in `Pending` if the nodepool is later disabled and they are not redeployed.
#### Settings for nodepools:
* **Instance types**: Define the list of instance types that can be used. (Shared for Stable and Default nodepools)
* **Spot instances**: Enable or disable spot instances. (Shared across the three nodepools)
* **Node disk size (GB)**: Specify the disk capacity allocated per worker node, determining the amount of data each node can store. (Shared for Stable and Default nodepools)
* **Consolidation schedule** *(Stable and Cronjob nodepools only)*: Optimizes resource usage by consolidating workloads onto fewer nodes. This feature is not available for the default nodepool, as consolidation can happen at any time. We recommend enabling this option; otherwise, nodes will never be consolidated, leading to unnecessary infrastructure costs.
* **Node pool limits**: Configure CPU and memory limits to ensure nodes stay within defined resource constraints, preventing excessive costs.
Instance type selection from your Qovery Console has direct consequences on your cloud provider's bill. While Qovery allows you to switch to a different instance type whenever you want, it is your sole responsibility to keep an eye on your infrastructure costs, especially when you want to upsize.
For more information on the instance types provided by each cloud provider and their associated pricing, see [What are the different instance types available when creating a cluster?](/configuration/clusters#what-are-the-different-instance-types-available-when-creating-a-cluster)
### Mirroring registry
In this tab, you will see that a container registry already exist (called `registry-{$UIID}`).
This is your cloud provider container registry used by Qovery to manage the deployment of your applications by mirroring the docker images.
The credentials configured on this registry are the one used to create the cluster. But you can still update them if you prefer to manage them separately (dedicated pair of creds just to access the registry).
Check [this link](/configuration/deployment/image-mirroring) for more information.
### Network
The `Network` tab in your cluster settings allows you to:
* check if the [**Static IP**](#static-ip), [**Custom VPC subnet**](#custom-vpc-subnet), [**Deploy on existing VPC**](#use-your-existing-vpc) features are enabled on your cluster. The enabled features cannot be changed after the creation of the cluster.
* Update your Qovery VPC route table so that you can perform VPC peering. For step-by-step guidelines on how to set up VPC peering, [see our dedicated tutorial](/configuration/integrations/aws/vpc-peering).
## Defining cluster node constraints to run your Services
### Define if your service can run on an on-demand instance
When using spot instances in your cluster, you may want to ensure that certain critical services, such as databases or essential applications, are always deployed on on-demand instances.
To specify that a service should be deployed on an `on-demand` instance, manually set the `deployment.affinity.node.required` advanced setting to:
```json theme={null}
{ "karpenter.sh/capacity-type": "on-demand" }
```
### Define the instance type to run your service
In some cases, you may need to ensure that a specific service runs on a particular instance type to meet performance, compliance, or cost requirements.
For example, to assign a service to the t3a.xlarge instance type, manually set the `deployment.affinity.node.required` advanced setting to:
```json theme={null}
{ "node.kubernetes.io/instance-type": "t3a.xlarge" }
```
The specified instance type must be included in the list of instance types
defined in the [NodePool configuration](#resources).
### Change the node pool of your service when using Helm
When using Helm, you can update the `affinity` field in your `values.yaml` file to target a specific node pool for your service. For example you can switch from the `default` to the `stable` nodepool:
```yaml theme={null}
affinity:
nodeAffinity:
requiredDuringSchedulingIgnoredDuringExecution:
nodeSelectorTerms:
- matchExpressions:
- key: karpenter.sh/nodepool
operator: In
values:
- stable
```
And you also have to add tolerations:
```yaml theme={null}
tolerations:
- effect: NoSchedule
key: nodepool/stable
operator: Exists
```